November 26, 2009

Turn On Remote Desktop in Windows 7 and Vista

Windows 7 ႏွင့္ Vistaသည္ ပံုမွန္အားျဖင့္ Remote Desktopအား ပိတ္ထားပါသည္။ သို႔ေသာ ၄င္းအား လြယ္ကူစြာျဖင့္ ဖြင့္ႏိုင္ပါသည္။ မိမိ၏ Vistaအား တျခားကြန္ပ်ဴတာမွ လွမ္းၾကည့္ခ်င္ပါက Remote Desktopအား ဖြင့္ဖို႔လိုအပ္ပါသည္။

မွတ္ခ်က္။ ။ Remote Desktopသည္ Business, Profesional, Ultimate Versionsတြင္သာ ပါပါသည္။ Home Editionတြင္ ယင္းမပါပါ။

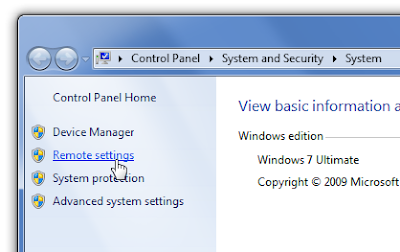
  1. System Configuration Page ကို သြားရပါမယ္။ ေခၚတဲ့နည္း (3)နည္းရွိပါတယ္။ (၁) - Start menu ေခၚ ၊ Menuမွ Computer ေပၚတြင္ Right-clickႏွိပ္ၿပီး ေပၚလာေသာ Menuမွ Properties ကိုႏွိပ္ပါ။ (2) Start Menuကိုေခၚပါ။ Search boxတြင္ Systemကို ရိုက္ထည့္၍ Enterေခါက္ပါ။ (၃) Control Panel > Systemကိုလည္း ႏွိပ္ႏိုင္ပါသည္။
  2. System Properties Windowsရဲ ဘယ္ဘက္အပိုင္းတြင္ Remote Settingကို ေတြ႔ရပါမည္။ ႏွိပ္လိုက္ပါ။

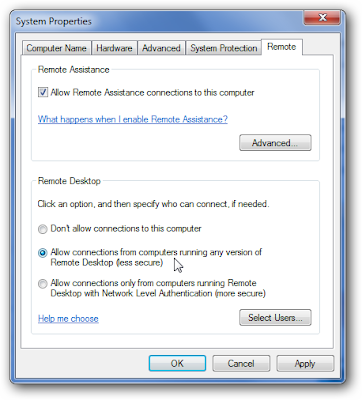
  3. System Properties Dialog Boxမွ Remote Tabေအာက္တြင္ "Allow Remote Assistance connection to this computer"ကိုအမွန္ျခစ္ျပပါ။ Remote Desktop ေအာက္တြင္ တတိယေရြးခ်ယ္မွဳကို ႏွိပ္လိုက္ပါ။

  4. Allpy > Ok
ဆက္ဖတ္ရန္

How to Create Password Reset Disk in Vista Using USB

လူတိုင္း လူတိုင္း မည့္သည့္အရာ၊ ကိစၥ မဆို တခါတရံ ေမ့တတ္ပါတယ္။ သို႔ျဖစ္ပါ၍ ကြန္ပ်ဴတာ အသံုးျပဳသူမ်ားသည္ ပို၍ ေမ့လြယ္ႏိုင္ပါသည္။ အဘယ္ေၾကာင့္ဆိုေသာ အခ်က္အလက္မ်ားစြာအား ဦးေႏွာက္ထဲသို႔ ထည့္သြင္းရပါေသာေၾကာင့္ျဖစ္သည္။

အခုတင္ျပမည့္ အေၾကာင္း အရာကေတာ့ USB Flash Driveကို အသံုးျပ၍ Windows Vista Admin Passwordအား (Reset) ျပန္လည္ ျပင္ဆင္ႏိုင္ရန္အတြက္ျဖစ္သည္။ ၾကိဳတင္ျပင္ဆင္မွဳ အေနနဲ႔ေပါ့။ တခါတရံ မိမိရဲ့ Passwordကို တျခားတေယာက္ေယာက္အား ေပးသိထားၿပီး Passwordအသစ္ကို ခဏခဏ ေျပာင္းလိုက္ရင္ ေမ့ႏိုင္ပါတယ္။ ဒါ့ေၾကာင့္ User Passwordကို ထည့္လိုက္တာနဲ႔ Password Resetလုပ္ဖို႔ သင့္ပါတယ္။
အကယ္၍ Windows Vista Userန႔ဲ Password တစ္ခုခုအားမွားယြင္းစြာ ရိုက္ထည့္လိုက္ပါက Error Message ထြက္လာမည္မွာ ေသခ်ာပါတယ္။
Reset Passwordလုပ္ဖို႔ USB တစ္ေခ်ာင္းေတာ့ လိုလိမ့္မယ္။ Floppy Diskကေတာ့ အခုေခတ္မွာ အသံုးနည္းသြားပါၿပီ။ ဒါ့ေၾကာင့္ USBနဲ႔ Reset Diskလုပ္ပါမယ္။ ေအာက္ပါအတိုင္းလုပ္ပါ။

  • ဦးစြာ USB Flash Driveအား ကြန္ပ်ဴတာႏွင့္ ခ်ိတ္ဆက္လိုက္ပါ။
  • Start Menu > Control Panel > User Account and Family Safety ႏွိပ္ပါ။
  • ထို႔ေနာက္ User Accounts ကိုႏွိပ္ပါ။
  • ထို႔ေနာက္ ဘယ္ဘက္ Paneတြင္ Create a password reset diskကို Task ရဲ့ေအာက္မွာႏွိပ္ပါ။

  • ထို႔ေနာက္ Password Reset Wizard's Welcome Screen Dialog Boxထြက္လာပါက Nextႏွိပ္ပါ။

  • ေနာက္တစ္မ်က္ႏွာတြင္ I want to create password key disk in the following driveတြင္ USB Driveကို ေတြ႔ပါမည္။ မဟုတ္ပါက ထပ္ေရြးၿပီး Nextကိုႏွိပ္ပါ။
  • လက္ရွိ User Password Boxထဲတြင္ လက္ရွိ Userရဲ့ Passwordကို ရိုက္ထည့္လုိက္ပါ။ ထို႔ေနာက္ Nextကိုႏွိပ္ပါ။ အကယ္၍ မိမိUserတြင္ Passwordမရွိေသးပါက Password boxကို အလြတ္ထားလိုက္ပါ။ အရင္ဦးဆံုးထည့္ထားပါက ေကာင္းပါလိမ့္မည္။


  • Prograss Barက ၁၀၀%ျပည့္သြားပါက Finishကိုႏွိပ္ပါ။ USBကို မလိုအပ္ေသးပါက ျဖဳတ္ႏိုင္ၿပီး လိုအပ္လ်င္ ထို USBအား နံမည္တပ္မည္/ သို႔မဟုတ္ အနာဂတ္မွာ Password Rest အသံုးျပဳဖို႔ အမွတ္အသားျပဳႏိုင္ပါသည္။
  • Password Reset Disk လုပ္ၿပီးသြားပါၿပီ။

Windows Vistaတြင္ Password ေမ့သြားၿပီး Reset လုပ္လိုပါက.

  • USBကို ကြန္ပ်ဴတာႏွင့္ ခ်ိတ္ဆက္လိုက္ပါ။ ထို႔ေနာက္ ကြန္ပ်ဴတာကိုဖြင့္လိုက္ပါ။
  • Longo ေနရာေရာက္ေနပါက Reset Passwordကိုႏွိပ္ပါ။

  • Password Reset Wizardတြင္ Next ကိုႏွိပ္ပါ။


  • ထို႔ေနာက္ The password key disk is in the following drive list စာသားေအာက္တြင္ မိမိ Reset Diskကို ေရြးၿပီး Nextကိုႏွိပ္ပါ။
  • ေနာက္ Screenတစ္ခုတြင္ Password အသစ္ကို ရိုက္ထည့္ပါ။ Confirmျဖစ္ဖို႔ ေနာက္တစ္ေခါက္ ရိုက္ထည့္ပါ။ Nextကို ထပ္ႏွိပ္ပါ။
  • ေနာက္ Screenတစ္ခုတြင္ ခုဏကရိုက္ထည့္တဲ့ Passwordကို ထပ္ရိုက္ပါ။ Confirm fieldတြင္ ထပ္ရိုက္ပါ။ Password hintကိုထည့္ Passwordမွတ္မိလြယ္ေအာင္ ရိုက္ထည့္ႏိုင္ပါသည္။

  • ထပ္ၿပီး Nextကို ထပ္ႏွိပ္ပါ။ Wizardကို Finishႏွိပ္၍ ပိတ္လိုက္ပါ။
  • ေနာက္ဆံုး Vista Userအား Passwordအသစ္ျဖင့္ ရိုက္သြင္း ၀င္လိုက္ပါ။

မွတ္ခ်က္။ ။ USBနဲ႔ Password Resetလုပ္တာနဲ႔ ပတ္သတ္လို႔ မည္သည့္ Vista Edition မဆို ျပဳလုပ္ႏိုင္ပါတယ္။ သို႔ေပမယ့္ မိမိ Vistaကို Password Reset Disk လုပ္ထားတဲ့ USBကို တျခားကြန္ပ်ဴတာအား အသံုးျပဳ၍ မရပါ။ ယင္း USB Reset diskအား လံုးျခံဳသည့္ေနရာတြင္ ထားရပါမည္။


ဆက္ဖတ္ရန္

August 25, 2009

Goodbye My Love

ကၽြန္ေတာ္ ခရီးထြက္ရေတာ့မွာ ျဖစ္တဲ့အတြက္ Postေတြ တင္ႏိုင္မွာ မဟုတ္ပါဘူး။ ခရီးက ၾကာမယ္ထင္ပါတယ္။ အေမ၊ အကို၊ တူမနဲ႔ ခ်စ္ခ်စ္ကိုလည္း ခြဲရေတာ့မယ္ေလ။ ဘ၀တိုးတက္ေရးအတြက္ ခဏတာ လမ္းခြဲရတာေပါ့။ ဘ၀ဆိုတာ ဒီလိုပါပဲ။ ကၽြန္ေတာ္ (၁၀)တန္းတံုးက The brookဆိုတဲ့ကဗ်ာကို မွတ္မိေသးတယ္။ Alfred Lord Tennyson ေရးထားတဲ့ ကဗ်ာေလ။ ဒီကဗ်ာကို အမွတ္တရ အေနနဲ႔ တင္လိုက္ပါတယ္။

The Brook
I come from haunts of coot and hern,
I make a sudden sally
And sparkle out among the fern,
To bicker down a valley.

By thirty hills I hurry down,
Or slip between the ridges,
By twenty thorpes, a little town,
And half a hundred bridges.

Till last by Philip's farm I flow
To join the brimming river,
For men may come and men may go,
But I go on for ever.

I chatter over stony ways,
In little sharps and trebles,
I bubble into eddying bays,
I babble on the pebbles.

With many a curve my banks I fret
By many a field and fallow,
And many a fairy foreland set
With willow-weed and mallow.

I chatter, chatter, as I flow
To join the brimming river,
For men may come and men may go,
But I go on for ever.

I wind about, and in and out,
With here a blossom sailing,
And here and there a lusty trout,
And here and there a grayling,

And here and there a foamy flake
Upon me, as I travel
With many a silvery waterbreak
Above the golden gravel,

And draw them all along, and flow
To join the brimming river
For men may come and men may go,
But I go on for ever.

I steal by lawns and grassy plots,
I slide by hazel covers;
I move the sweet forget-me-nots
That grow for happy lovers.

I slip, I slide, I gloom, I glance,
Among my skimming swallows;
I make the netted sunbeam dance
Against my sandy shallows.

I murmur under moon and stars
In brambly wildernesses;
I linger by my shingly bars;
I loiter round my cresses;

And out again I curve and flow
To join the brimming river,
For men may come and men may go,
But I go on for ever.

---------------------------------------------------------------
ေနာက္တစ္ပုဒ္က ကၽြန္ေတာ့္ရဲ့ အရင္းနီးဆံုးလူတစ္ေယာက္အတြက္ေပါ့။

Goodbye My love
Remember me when I am gone away,
Gone far away into the silent land;
When you can no more hold me by the hand,
Nor I half turn to go yet turning stay.
Remember me when no more day by day
You tell me of our future that you plann'd:
Only remember me; you understand
It will be late to counsel then or pray.
Yet if you should forget me for a while
And afterwards remember, do not grieve:
For if the darkness and corruption leave
A vestige of the thoughts that once I had,
Better by far you should forget and smile
Than that you should remember and be sad.

By Christina Rossetti

ရႊင္လန္းခ်မ္းေျမ့ပါေစ။
ဆက္ဖတ္ရန္

August 22, 2009

Related Posts Widget with Photo Thumbnails

တူညီတဲ့ Categoriesမ်ားမွာ တူညီတဲ့ အေၾကာင္းအရာမ်ားနဲ႔ ပတ္သတ္ၿပီး Related Posts Widgetက ေဖာ္ျပပါတယ္။ Postsမ်ားတင္တိုင္း သက္ဆိုင္ရာ တူညီတဲ့ Postမ်ားအား ေဖာ္ျပျခင္းအားျခင့္ စာဖတ္သူအား စိတ္၀င္စားဖြယ္ရာ တူညီတဲ့ Postေတြကို လြယ္ကူစြာျဖင့္ ရွာေဖြေစႏိုင္ပါတယ္။ ယခင္ Postေတြမွာလည္း ပံုစံတူ ေဖာ္ျပထားပါတယ္။ ဒါေပမယ့္ ယခု Postက Thumbnail ပံုေတြ ပါတဲ့ Related Posts Widgetျဖစ္ပါတယ္။ ဒီ Widgetက Postေတြရဲ့ေခါင္းစဥ္ေတြကို ျပပါတယ္။ Postထဲမွာရွိတဲ့ ပံုကေတာ့ အေပၚမွာ ေပၚပါတယ္။ ပံုစံကိုေတာ့ ကၽြန္ေတာ့္ရဲ့ Blogထဲမွာ တင္ျပထားပါတယ္။ သိပ္လွပၿပီး စာဖတ္သူမ်ား လြယ္ကူစြာျဖင့္ အသံုးျပဳႏိုင္ပါတယ္။

သေဘာက်တယ္ဆိုရင္ ကိုင္း.. ထည့္ၾကရေအာင္။

  • LinkWithin ကိုသြားပါ။
  • Form ျဖည့္ရပါမယ္။

  • email လိပ္စာ၊ Blog URL၊ Platformက Bloggerေရြး၊ Widthက 5 storiesယူ၊
  • ေနာက္တစ္ခုက My blog has light text on a dark background အကယ္၍ သင့္Blog Backgroundက အမည္းေရာင္ျဖစ္ၿပီး စာလံုးက ေတာက္ပတဲ့အေရာင္ျဖစ္ေနပါက အမွန္ျခစ္ျပပါ။ တျခားအေရာင္ျဖစ္ေနပါက အမွန္ျခစ္ မျပပါနဲ႔။ စာလံုး မထင္းရွားေသာေၾကာင့္ျဖစ္တယ္။
  • Get Widget buttonကိုႏွိပ္ပါ။
  • စာမ်က္ႏွာပါ အဆင့္ဆင့္အတိုင္း ဆက္သြားပါ။
  • Install Widgetကိုႏွိပ္ပါ။
  • Windowေနာက္တစ္ခု ထြက္လာပါမည္။ Blog ကိုေရြးၿပီး Add Widget buttonကိုႏွိပ္ပါ။
  • အေရးႀကီးသည္မွာ ယင္းထည့္သြင္းလိုက္ေသာ Widgetအား Post Areaရဲ့ေအာက္မွာ သြားထားရပါမည္။ ၿပီးက Save ထပ္ႏွိပ္လိုက္ပါ။


  • View Blogကို သြားပါ။
  • ၿပီးပါၿပီ။
ဆက္ဖတ္ရန္

August 14, 2009

Run Boxထဲမွာ gpedit.msc ဖြင့္လို႔ မရပါက

ယု္မု္ေသွ္ယာ့့၀းသာ လု္ယု္ကြန္ပ်ဴတာ run box ဖုိင္ဏွ္ gpedit.msc ေဍာဟ္လင္ေဏ၀္လုိင္ေအး.. မု္၀းမာ ပု္ေသွ္လယ့္ဏွ္ စာ္ဂုဏ္စာ္တာ၀း ေဆ၀္လွ္.
ကၽြန္ေတာ္ဘာ လုပ္ရမွာလဲ။ Run Boxထဲမွာ gpedit.mscရိုက္ထည့္လုိ႔ မရလို႔ ဘယ္လိုလုပ္ရမယ္ဆိုတာ ေက်းဇူးျပဳ၍ ေျပာျပပါဦး။

ေမးလာပါတယ္။


ဒါကို မေျဖၾကားခင္ ကၽြန္ေတာ္ ေမးခြန္တစ္ခု ထုတ္ခ်င္ပါတယ္။

သင္၏ Windows XPက Home Editionျဖစ္ေနပါသလား။ Home Editionဆိုရင္ gpedit.msc (Group Policy Editor) မပါလာပါဘူး။ အဘယ္ေၾကာင့္ဆိုေသာ XP Homeသည္ Standalone versionျဖစ္ေသာေၾကာင့့္ျဖစ္သည္။

Windows Vista ျဖစ္ေနပါက Vista Home Premiumဆိုရင္ gpedit.mscမပါလာပါ။ Vista Business, Ultimate and Enterpriseဆိုရင္ ပါလာပါတယ္။ တိက်တဲ့ Informationကို သိခ်င္ရင္ေတာ့ ဒီ Forumမွာ ၀င္ၾကည့္ႏိုင္ပါတယ္။
အကယ္၍ တျခား Version အထူးသျဖင့္ Windows XP Proဆိုရင္ေတာ့ ပါလာပါတယ္။ ပါလာရဲ့သားနဲ႔ ေခၚလို႔ မရေသးဘူးဆိုရင္ Virus ေၾကာင့္ အမ်ားဆံုးျဖစ္ႏိုင္ပါတယ္...

Registry Editorထဲမွာ သြားၿပီး ျပင္ဆင္ႏိုင္ပါတယ္။ သို႔ေပမယ့္ Registry Editorထဲတြင္ အျပင္အဆင္ မွားသြားပါက မိမိ၏ Windows problemsမ်ားစြာ ျဖစ္လာႏိုင္ေသာေၾကာင့္ မတင္ျပခ်င္ပါ။ ထို႔ေၾကာင့္ Consoleထဲတြင္ သြင္းထည့္ႏိုင္ပါသည္။
  • Start menu > Run > "mmc"ကို ရိုက္ထည့္ပါ။ Consoleဖြင့္ျခင္းျဖစ္သည္။
  • Console 1 Windowမွ File menu> Add/Remove snap in...ကိုႏွိပ္ပါ။
  • Add/Remove snap in.. dialog boxမွ Add buttonကိုႏွိပ္ပါ။ ပံုပါအတိုင္းျဖစ္သည္။
  • ထို႔ေနာက္ Add Standalone snap-in dialog boxမွ Available Standalone snap-ins ေအာက္ကိုသြားၿပီး Group Policy Object Editorကို selectလုပ္ကာ Add buttonႏွိပ္လိုက္ပါ။
  • ထို႔ေနာက္ Finish buttonကို ႏွိပ္လိုက္ပါ။ Okဆက္ႏွိပ္ပါ။ Saveလုပ္ပါ။
  • ဒါဆိုရင္ gpedit.msc ေပၚလာပါၿပီ။
အကယ္၍ မရေသးပါက အေၾကာင္းၾကားပါရန္။
ဆက္ဖတ္ရန္

August 12, 2009

အဂၤလိပ္ - ဗမာ - ကရင္ အဘိဓါန္


တိုင္းရင္းသား ေသြးစည္းညီညြတ္ေရး ဆိုတဲ့စကားအတိုင္း ကၽြန္ေတာ္တို႔ရဲ့ ျမန္မာႏိုင္ငံသားမ်ား ေသြးစည္းညီညြတ္ၾကပါတယ္။ ဒါေၾကာင့္ ျမန္မာႏိုင္ငံသား Bloggerမ်ားစြာ ထြက္ရွိခဲ့ပါတယ္။ အားရစရာေကာင္းပါတယ္။ ကၽြန္ေတာ္လည္း ထိုထဲက တစ္ေယာက္ျဖစ္ပါတယ္။ ကၽြန္ေတာ္က ပညာေရးနဲ႔ ဘ၀ကို ျဖတ္သန္းေနပါေသာေၾကာင့္ I will apply my knowledge to my people whatever I have right now and whatever I will get in the futre. ဒါက ကၽြန္ေတာ့္ရဲ့ ကိုယ္ပိုင္ေဆာင္ပုဒ္ ျဖစ္ပါတယ္။

ယခုတင္ျပမယ့္ Postက ဆရာ Ogreမွ တင္ျပၿပီးသား Postျဖစ္ပါတယ္။ သူေရးသားထားတဲ့
စာသားအတိုင္း တင္ျပသြားပါမယ္။

Eglish-ဗမာ-ကရင္ Dictionary ေလးပါ ။
Comment ထဲမွာေတြ႔လို႔တင္ေပးလိုက္ျခင္း ျဖစ္ပါ၏ .. :-P
ကရင္ font အတြက္ေတာ့
knu ဆိုတဲ့ font ကို font folder ထဲမွာ သြားထည့္ဖို႔ေတာ့လိုပါတယ္ ..
.NET
Framework (2.0) ေလးလည္းလိုပါတယ္ဗ်ာ .. window ထဲမွာ Framework မရွိရင္ေတာ့ ဒါေလးကို download ခ်ၿပီး install
လုပ္ဖို႔ေတာ့လိုပါတယ္ဗ်ာ ..
အဆင္ေျပပါေစ ... :-)

Size : 2.86 MB

Download
http://ifile.it/i4k3f08
-------------------------------------------------
OR
Download
http://www.zshare.net/download/63988837a4bc792b/
-------------------------------------------------
OR
Download
http://www.megaupload.com/?d=X8IY5LWZ
-------------------------------------------------
OR
Download
http://www.mediafire.com/?2fkou03mzor
-------------------------------------------------
ဆက္ဖတ္ရန္

ျမန္မာ - အဂၤလိပ္ - ျမန္မာ အဘိဓါန္


ျမန္မာႏိုင္ငံသားမ်ား တိုးတက္ရာ တိုးတက္ေၾကာင္း မိမိကြန္ပ်ဴတာတြင္ အဘိဓါန္လိုအပ္ပါလိမ့္မယ္။ ဒါ့ေၾကာင့္ ဒီ အဘိဓါန္ေလးကို ကြန္ပ်ဴတာထဲမွာ ထည့္သင့္ပါတယ္။ ေဖာင့္အေနနဲ႕လည္း Zawgyi-one, Myanmar3, Ayar Burmese စတဲ့ (၃)မ်ိဳးပါတာေၾကာင့္ ႀကိဳက္တာသံုးႏိုင္တာကို ေတြ႔ရပါတယ္။ ဒီ program ေလးကို ကိုစိုးမင္းမွ ေရးသားထားတာ ျဖစ္ပါတယ္။

Name: wxPyDict_setup.rar
File size: 5.29 MB
Description: This program for all
ဒီမွာယူပါ။

ဆက္ဖတ္ရန္

August 11, 2009

Blogger မ်ားသိေစရန္

ေထြေထြထူးထူးေတာ့ မဟုတ္ပါဘူး။ HTML linkနဲ႔ ပတ္သတ္တဲ့ အေၾကာင္းအရာေလးပါ။ သာမန္အားျဖင့္ Blogspotမွေပးေသာ Linkသည္ ရိုးရိုး Linkသာျဖစ္ပါတယ္။ မိမိခ်ိပ္လိုက္ေသာ Linkသည္ မိမိ၏ Webpageမွ ထြက္သြားၿပီး ထိုLink၏ Webpageသို႔သြားပါမည္။ ဒီလိုသာဆိုရင္ မိမိ၏ ဧည့္သည္သည္ မိမိBlogမွ ထြက္သြားၿပီး အျခားေနရာသို႔ ေရာက္သြားမည္မွာ ေသခ်ာပါသည္။ မ်ားေသာအားျဖင့္ မိမိBlogမွ ထြက္မသြားလိုေသာ ဧည့္သည္သည္ ထိုLinkအား Right-clickႏွိပ္ၿပီး ေပၚလာတဲ့ Menuမွ New Tab (သို႔) New Windowကို ေခၚရပါမည္။ ဒါေၾကာင့္ ဤ Postကို တင္လိုက္ရျခင္း ျဖစ္ပါတယ္။

Link ရိုးရိုးသည္။

<a href="http://www.yahoo.com">Go to Yahoo</a>


ေအာက္ပါအတိုင္း ေပၚမည္ျဖစ္သည္။
Go to Yahoo

မိမိ၏ Blogမွ မထြက္ေစပဲ ယင္း Link၏ New Window pageကုိ သြားလိုပါက..


<a href="http://www.yahoo.com" target="_blank">Go to Yahoo</a>


ေအာက္ပါအတိုင္း ေပၚမည္ျဖစ္သည္။
Go to Yahoo

စမ္းသပ္ၾကည့္ပါ။
ဆက္ဖတ္ရန္

Transperant Calendar ထည့္လိုပါက


ကၽြန္ေတာ့္ Blogထဲကလို Transperant Calendarထည့္လိုပါက ထည့္ႏိုင္ပါၿပီ။ ဤ Calendarကို ကၽြန္ေတာ္ အရမ္းႏွစ္သက္ပါသည္။ အဘယ္ေၾကာင့္ဆိုေသာ္ ရိုးရွင္းၿပီး Updatedျဖစ္ပါသည္။ HTMLျဖင့္ ေရးသားထားျခင္းျဖစ္ပါသည္။ မိမိ၏ Templateေပၚ မူတည္ၿပီး Transperantျဖစ္ပါမည္။ မ်ားေသာအားျဖင့္ တပည့္မ်ား ႀကိဳက္ၾကပါသည္။ အျခားေသာ Calendarမ်ားစြာ ရွိပါေသာ္လည္း ျပဳလုပ္သူ၏ Labelပါေသာေၾကာင့္ မၾကိဳက္ပါ။ သင္ထည့္လိုပါက ေအာက္ပါအဆင့္တိုင္း ယူပါ။


၁။ ဤ Calendar Linkကိုႏွိပ္ပါ။ ယင္း fileကို Google Docsထဲမွာ ထည့္ထားပါတယ္။

၂။ Codeကို ကူးယူပါ။

၃။ Blogger Sign In > Layout > Page Elements > Add a gedgetကို ႏွိပ္ပါ။

၄။ HTML/JavaScriptကို ေရြးခ်ယ္လိုက္ပါ။

၅။ ကူးယူထားေသာ Codeကို Pasteလုပ္လိုက္ပါ။

၆။ Save လုပ္ပါ။ မိမိထားလိုသည့္ ေနရာတြင္ ထားၿပီး Saveထပ္လုပ္ပါ။


ဒါဆိုရင္ ရိုးရွင္းၿပီး သိပ္လွပတဲ့ ျပကၡဒိန္ကို ရပါမည္။


Vote ေပးသြားပါဦး။
ဆက္ဖတ္ရန္

August 10, 2009

Twitter Attack To Silence Georgian Blogger


တင္ျပသူ - Posted in Social Network by AURUM3 NewTech on the August 9th, 2009


DDoSနည္းျဖင့္ Twitterကို ဆန္႔က်င္တိုက္ခိုက္တဲ့သူကေတာ့ Russiaမွျဖစ္ပါတယ္။ ထိုလူသည္ Republic of Georgiaႏိုင္ငံမွ အသက္34ႏွစ္ စီးပြားေရးပါရဂူ တစ္ဦးသာျဖစ္ပါတယ္။ Abkhazia Georgian bloggerသည္ ၄င္း၏ Blogမွ Russiaႏွင့္ Georgiaႏွစ္ႏိုင္ငံ နယ္နိမိတ္စစ္ပြဲအက်ဥ္း ထိုျဖစ္ရပ္မ်ားကို ဦးေဆာင္ခ်ျပထားသည္။


ယင္း Russia ႏိုင္ငံမွ သိရသည့္ တိုက္ခိုက္သူမ်ားသည္ Spam Email Messagesမ်ားစြာကို ေပးပို႔ခဲ့ၿပီး Twitter, Facebookကိုလည္း ဒရစပ္ တိုက္ခိုက္ကာ အျခားေသာ ၀န္ေဆာင္မွဳမ်ားကိုလည္း Junk messagesမ်ားျဖင့္ ၀င္ေရာက္ ေႏွာင့္ယွက္ခဲ့သည္။
ဆက္ဖတ္ရန္
Blog Widget by LinkWithin
 

Popular Posts

Widget by Blogger Buster

Sign In and Check Message

ယေန႔ဖတ္သြားေသာ ေခါင္းစဥ္မ်ား

Recent Posts