July 31, 2009

Email Me Formထည့္သင့္ေၾကာင္း

Email Formကို Blogထဲတြင္ ထည့္သင့္ပါသည္။ ဘာေၾကာင့္ထည့္သင့္ပါသလဲ?။ ထည့္သင့္တာေပါ့။ မိမိ Blogထဲသို႔ေရာက္လာေသာ စာဖတ္သူေတြက အေၾကာင္းတစ္စံုတစ္ရာကို သိခ်င္တယ္။ အၾကံေပးလိုတယ္။ Messageပို႔ခ်င္တယ္။ ေမးျမန္းလိုတယ္။ အၾကံေတာင္းလိုတယ္။ ဒါကို အခ်ိန္အတိုတြင္းမွာ Emailပို႔သလို တိုက္ရိုက္ပို႔ႏိုင္ပါတယ္။ ပို႔ဖို႔ Message serverထဲ၀င္စရာမလိုပါဘူး။ မိမိ Blogမွ တိုက္ရိုက္ပို႔ႏိုင္ပါတယ္။ ဒါဆို သိပ္ထည့္သင့္တာေပါ့။ ဒါဆို ဘယ္လိုထည့္မွာလဲ။

အဆင့္ေတြက မ်ားပါတယ္။ စိတ္ရွည္စြာ ထည့္သြင္းရပါမယ္။ သရက္သီးမွည့္စားခ်င္ရင္ မွည့္တဲ့အထိ ေစာင့္ရမွာေပါ့။ မေလာနဲ႔ေနာ္.. ။ အမွားလုပ္မိမယ္။ မလိမ္မာရင္ သံုးခါေမာမယ္။ ပံုစံကို ၾကည့္ခ်င္ရင္ေတာ့ ဒီမွာ ၾကည့္ပါ။

ဦးစြာ..
၁။ ဤ Websiteထဲကို၀င္ပါ။
၂။ ၄င္း Pageမွ Signup for Free linkကိုႏွိပ္ပါ။
၃။ Sign Up လုပ္ၿပီးပါက မိမိ၏ Emailထဲသို႔ Link တစ္ခုပို႔ပါမည္။ Activateလုပ္ရန္ Linkပို႔ျခင္းျဖစ္သည္။
၄။ မိမိ၏ Emailထဲသို႔၀င္ပါ။ ဥပမာ - Gmail။ ၀င္ၿပီးပါက Emailmeform websiteမွ ပို႔လာေသာ Messageကို ေတြ႔ရမည္ျဖစ္သည္။ ထို Linkအားႏွိပ္ပါ။ ဒါဆို Activateလုပ္ၿပီးပါၿပီ။
၅။ Helloဆိုၿပီ သင့္အား ႀကိဳဆိုပါမည္။ Nagivation Barေအာက္တြင္ Create New Form Linkကိုႏွိပ္ပါ။
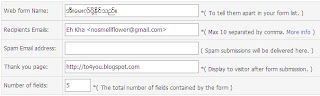
၆။ Web Form Wizard - Step 1တြင္
- Web Form Nameေပးပါ။ ျမန္မာလိုေပးႏိုင္သည္။
- Recipients Emails: တြင္ သင္၏ Emailလိပ္စာကိုျပမည္။ ျပင္စရာမလိုပါ။
- Spam Email address: ထည့္စရာ မလိုပါ။
- Thank you page: သည့္ တစ္ေယာက္ေယာက္က Messageပို႔ၿပီးက ေပၚလာမည့္ သင္၏ Blogစာမ်က္ႏွာျဖစ္သည္။ မိမိ၏ Blog URLအား ထည့္ပါ။ ဥပမာ - http://to4you.blogspot.com
- Number of fields:သည့္ မိမိထည့္လိုေသာ Fieldျဖစ္သည္။ ကၽြန္ေတာ့္ Blogတြင္ Field ၅ခု ထည့္ထားပါသည္။
ၿပီးက Next buttonကို ႏွိပ္ပါ။


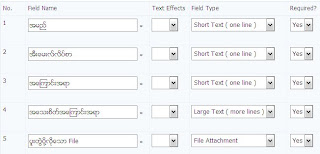
၇။ မိမိ၏ Field Nameကို ထည့္သြင္းရမည္ျဖစ္သည္။
- ကၽြန္ေတာ္၏ Blogတြင္ (အမည္၊ အီးေမးလ္လိပ္စာ၊ အေၾကာင္းအရာ၊ အေသးစိတ္အေၾကာင္းအရာ၊ ပူးတြဲပို႔လိုေသာ File ဟူ၍ ျမန္မာလို ထည့္သြင္းထားပါသည္။ Text
- Text Effectထည့္ႏိုင္သည္။
- Field Typeတြင္ အေသးစိတ္အေၾကာင္းအရာ Fieldအား Large Text (More Lines) ထည့္ရမည္။ အဘယ္ေၾကာင့္ဆိုေသာ အေသးစိတ္ Messageကို ထည့္ရျခင္းေၾကာင့္ျဖစ္သည္။ ပူးတြဲပို႔လိုေသာ Fileတြင္ (File Attachment) ေရြးရမည္ျဖစ္သည္။ အဘယ္ေၾကာင့္ဆိုေသာ ပူးတြဲ Fileထည့္ရန္ျဖစ္သည္။ Required? တြင္ Yes အခုတိုင္း ေရြးရမည္ျဖစ္သည္။ Next buttonကိုႏွိပ္ပါ။

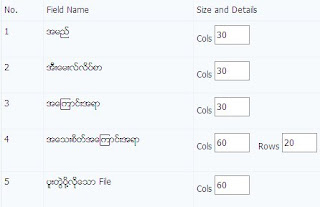
၈။ Step 3 တြင္ No., Field Name and Size and Details ရွိပါသည္။ သင္ျပင္ရမ်ာ က Size and Detailsသာ ျဖစ္သည္။ အဘယ္ေၾကာင့္ဆိုေသာ္ မိမိ၏ Post Areaေပၚမူတည္ၿပီး Sizeကို ျပင္ရမည္ျဖစ္သည္။ ကၽြန္ေတာ့္၏ Formရွိ အေသးစိတ္အေၾကာင္းအရာတြင္ clos= 60ႏွင့္ Rows=20 ထားထားပါသည္။ ပူးတြဲပို႔လိုေသာ Fileတြင္ ၅၀ထားပါသည္။ ျပင္ၿပီးက Nextကိုႏွိပ္ပါ။


၉။ Step 4တြင္
- Font Face၌ Verdana, Zawgyi-oneထည့္ေပးပါ။
- Size=2,
- Textႏွင့္ Backgroundတြင္ အေရာင္ေျပာင္းႏိုင္သည္။ HTML color codeကိုထည့္ႏိုင္သည္။
- Form Descriptionသည့္ မိမိ Form၏ အေပၚတြင္ ေပၚမည့္စာသားျဖစ္သည္။ ထည့္သင့္ပါသည္။ ကၽြန္ေတာ့္ Blog၏ ဆက္သြယ္ရန္ ေနရာတြင္ ၾကည့္ပါ။


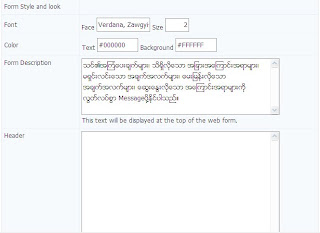
- ေလာေလာဆယ္ မလိုအပ္ေသးသည့္ အရာမ်ား မထည့္ထားပါ။
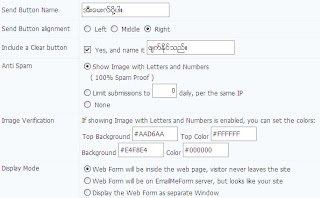
- Send Button Nameကို ျမန္မာလိုေရးႏိုင္သည္။ ကၽြန္ေတာ္က "အီးေမးလ္ပို႔ပါ။"ဟုေရးထားပါသည္။ Alignmenကို Rightလုပ္ထားပါသည္။ မိမိထားလိုေသာေနရာတြင္ ထားပါရန္။
- Include Clear button- ဖ်က္ႏိုင္သည္ဆိုသည့္ Buttonေလး ထည့္လိုပါက။ ကၽြန္ေတာ္ထည့္ထားပါသည္။
- Anti-Spam တြင္ Show Image with letters and numberမ်ားကို ျပရပါမည္။
- Display Modeသံုးခုရွိသည့္အနက္ Web Form will be inside the web page, visitors never leave the siteကို ေရြးခ်ယ္ရန္ အသင့္ေတာ္ဆံုးျဖစ္သည္။ ထိုမွသာလွ်င္ ဧည့္သည္ေတာ္မ်ား အထြက္သြားႏိုင္ပါ။

- ၿပီးက Next ကိုႏွိပ္ပါ။
၁၀။ Step 5တြင္ Send copy of senderႏွင့္ Include data for exportကို Yes ျပထားသင့္သည္။ Nextကိုႏွိပ္ပါ။
၁၁။ Step 6သည့္ Formေပၚမည့္ပံုစံျဖစ္သည္။ ပံုစံမႀကိဳက္ေသးပါက Backလုပ္၍ ျပင္ႏိုင္ပါသည္။ ထို႔ေနာက္ Finish buttonကိုႏွိပ္ပါ။
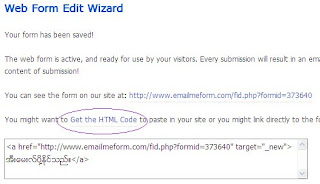
၁၂။ You form has been saved သိမ္းၿပီးေၾကာင္း. ထိုေနရာတြင္ Get the HTML codeကိုႏွိပ္ပါ။
၁၃။ Copy and Paste the HTML codeတြင္ ထို Codeအား ကူးယူၿပီး


ဆက္သြယ္ရန္ဆိုသည့္ Postအတြက္ New Postကို ေခၚၿပီး HTML viewျဖင့္ႏွိပ္ကာ ထို Codeအား Pasteလုပ္လိုက္ပါ။ ေခါင္းစဥ္အား ဆက္သြယ္ရန္ ရိုက္ထည့္ပါ။ ၾကိဳက္သလို ထည့္ႏိုင္သည္။

၁၄။ Publish Postႏွိပ္ပါ။ လုပ္ေဆာင္ခ်က္ ၿပီးပါၿပီ။
မိမိျပဳလုပ္ၿပီးေသာ Formအား www.emailmeform.comတြင္ ျပန္ျပင္ႏိုင္ပါသည္။ Formမ်ားစြာကိုလည္း ဖန္တီးႏိုင္ပါသည္။
အဆင္ကေတာ့ မ်ားပါတယ္။ စိတ္ရွည္စြ
ဆက္ဖတ္ရန္

July 28, 2009

Flash Animated Labels Tag Cloudထည့္ရေအာင္

Blogတိုင္းတြင္ ပံုမွန္အားျဖင့္ Side Bar၌ Labels widgetမ်ားပါပါသည္။ တခ်ိဳ႔ေသာ Bloggerမ်ားသည္ ထိုပံုစံကို မႏွစ္သက္ၾကပါသည္။ ထို႔ေၾကာင့္ မိမိတို႔ႏွစ္သက္ေသာ ပံုစံမ်ားကို ရွာေဖြေလ့ရွိပါသည္။ ယခုတင္ျပမည့္ အေၾကာင္းအရာကေတာ့ Flash Animated Label Tags Cloudျဖစ္ပါတယ္။ ႏွစ္သက္မယ္လို႔ ယံုၾကည္ပါတယ္။ မိမိတို႔၏ ဧည့္သည္မ်ားသည္လည္း ပံုစံသစ္ Labelကို ႏွစ္သက္ၾကပါတယ္။ ဒါေၾကာင့္ Styleသစ္ တင္ရန္ လိုပါသည္။ ကၽြန္ေတာ့္ရဲ့ Blogမွာလည္း တင္ထားပါတယ္။ Page နဲ႔လိုက္ေအာင္လည္း အေရာင္ျပင္ထားပါတယ္။
ကိုင္း ဒါကို ဘယ္လိုထည့္မွာလဲ?

၁။ Blog Sign In> Dashboard> Layout> Edit HTMLကိုႏွိပ္ပါ။ Expend Widgetကို အမွန္ျခစ္ျပဖို႔ မေမ့ပါနဲ႔။
၂။ ေအာက္ပါ Codeကိုရွာပါ။


<b:section class='sidebar' id='sidebar' preferred='yes'>


၃။ ရွာထားေသာ အေပၚCode၏ေအာက္တြင္ ေအာက္ပါ codeကို ထည့္သြင္းလိုက္ပါ။

ဤ Codeကို Google Docထဲတြင္ထည့္ထားပါသည္။ ယူပါရန္။

၄။ Save Templateလုပ္ပါ။

မွတ္ခ်က္။ ။ Page Elementတြင္ Label ဆိုသည့္ gedgetကို ေတြ႔ရပါလိမ့္မည္။ မိမိထားလိုသည့္ ေနရာတြင္ ေျပာင္းလိုက္ပါ။ width="250" height="200" ကိုလည္းေျပာင္းႏိုင္ပါသည္။
ဆက္ဖတ္ရန္

Adding Falling Hearts in Bloggerထည့္ရေအာင္

အရင္တစ္ေခါက္ကတင္တဲ့ Adding Falling Starsအတိုင္း ေပါ့ပါးတဲ့ Falling Objectsေတြကို ထပ္တင္လိုက္ပါတယ္။ ႀကိဳက္တယ္ဆိုရင္ ထည့္လိုက္ေပါ့။

နမူနာပံုစံကို ဤ Blogမွာ ၾကည့္ႏိုင္ပါတယ္။

၁။ Blogger Sign In> Layout > Page Elements > Add a gadget >HTML/JavaScriptေခၚပါ။
၂။ ေအာက္ပါ Codeကို ကူးယူ၍ Pasteလုပ္ပါ။


<marquee behavior="scroll" direction="down" style="position:absolute; left:110px; top:150px; width:16px; height:483px; z-index:1;" scrollamount="3"><span class="falling1"><img src="http://www.allblogtools.com/imgup/12-2008/uploaded/heart3.gif"/></span></marquee>

<marquee behavior="scroll" direction="down" style="position:absolute; left:169px; top:170px; width:16px; height:411px; z-index:1;" scrollamount="2"><span class="falling2"><img src="http://www.allblogtools.com/imgup/12-2008/uploaded/heart3.gif"/></span></marquee>

<marquee behavior="scroll" direction="down" style="position:absolute; left:213px; top:190px; width:16px; height:346px; z-index:1;" scrollamount="3"><span class="falling1"><img src="http://www.allblogtools.com/imgup/12-2008/uploaded/heart3.gif"/></span></marquee>

<marquee behavior="scroll" direction="down" style="position:absolute; left:279px; top:180px; width:16px; height:512px; z-index:1;" scrollamount="1"><span class="falling2"><img src="http://www.allblogtools.com/imgup/12-2008/uploaded/heart3.gif"/></span></marquee>

<marquee behavior="scroll" direction="down" style="position:absolute; left:310px; top:160px; width:16px; height:428px; z-index:1;" scrollamount="7"><span class="falling1"><img src="http://www.allblogtools.com/imgup/12-2008/uploaded/heart3.gif"/></span></marquee>

<marquee behavior="scroll" direction="down" style="position:absolute; left:250px; top:190px; width:16px; height:206px; z-index:1;" scrollamount="5"><span class="falling2"><img src="http://www.allblogtools.com/imgup/12-2008/uploaded/heart3.gif"/></span></marquee>

<marquee behavior="scroll" direction="down" style="position:absolute; left:148px; top:150px; width:16px; height:287px; z-index:1;" scrollamount="7"><span class="falling1"><img src="http://www.allblogtools.com/imgup/12-2008/uploaded/heart3.gif"/></span></marquee>

<marquee behavior="scroll" direction="down" style="position:absolute; left:297px; top:170px; width:16px; height:239px; z-index:1;" scrollamount="6"><span class="falling2"><img src="http://www.allblogtools.com/imgup/12-2008/uploaded/heart3.gif"/></span></marquee>

<marquee behavior="scroll" direction="down" style="position:absolute; left:110px; top:230px; width:16px; height:254px; z-index:1;" scrollamount="7"><span class="falling1"><img src="http://www.allblogtools.com/imgup/12-2008/uploaded/heart3.gif"/></span></marquee>

<marquee behavior="scroll" direction="down" style="position:absolute; left:369px; top:190px; width:16px; height:420px; z-index:1;" scrollamount="3"><span class="falling2"><img src="http://www.allblogtools.com/imgup/12-2008/uploaded/heart3.gif"/></span></marquee>

<marquee behavior="scroll" direction="down" style="position:absolute; left:385px; top:150px; width:16px; height:520px; z-index:1;" scrollamount="3"><span class="falling1"><img src="http://www.allblogtools.com/imgup/12-2008/uploaded/heart3.gif"/></span></marquee>

<marquee behavior="scroll" direction="down" style="position:absolute; left:441px; top:170px; width:16px; height:381px; z-index:1;" scrollamount="4"><span class="falling2"><img src="http://www.allblogtools.com/imgup/12-2008/uploaded/heart3.gif"/></span></marquee>

<marquee behavior="scroll" direction="down" style="position:absolute; left:477px; top:200px; width:16px; height:392px; z-index:1;" scrollamount="7"><span class="falling1"><img src="http://www.allblogtools.com/imgup/12-2008/uploaded/heart3.gif"/></span></marquee>

<marquee behavior="scroll" direction="down" style="position:absolute; left:569px; top:170px; width:16px; height:485px; z-index:1;" scrollamount="6"><span class="falling2"><img src="http://www.allblogtools.com/imgup/12-2008/uploaded/heart3.gif"/></span></marquee>

<marquee behavior="scroll" direction="down" style="position:absolute; left:599px; top:200px; width:16px; height:386px; z-index:1;" scrollamount="3"><span class="falling1"><img src="http://www.allblogtools.com/imgup/12-2008/uploaded/heart3.gif"/></span></marquee>

<marquee behavior="scroll" direction="down" style="position:absolute; left:530px; top:170px; width:16px; height:383px; z-index:1;" scrollamount="1"><span class="falling2"><img src="http://www.allblogtools.com/imgup/12-2008/uploaded/heart3.gif"/></span></marquee>

<marquee behavior="scroll" direction="down" style="position:absolute; left:608px; top:200px; width:16px; height:347px; z-index:1;" scrollamount="1"><span class="falling1"><img src="http://www.allblogtools.com/imgup/12-2008/uploaded/heart3.gif"/></span></marquee>

<marquee behavior="scroll" direction="down" style="position:absolute; left:642px; top:250px; width:16px; height:435px; z-index:1;" scrollamount="7"><span class="falling2"><img src="http://www.allblogtools.com/imgup/12-2008/uploaded/heart3.gif"/></span></marquee>

<marquee behavior="scroll" direction="down" style="position:absolute; left:681px; top:290px; width:16px; height:499px; z-index:1;" scrollamount="3"><span class="falling1"><img src="http://www.allblogtools.com/imgup/12-2008/uploaded/heart3.gif"/></span></marquee>

<marquee behavior="scroll" direction="down" style="position:absolute; left:659px; top:180px; width:16px; height:222px; z-index:1;" scrollamount="7"><span class="falling2"><img src="http://www.allblogtools.com/imgup/12-2008/uploaded/heart3.gif"/></span></marquee>

<marquee behavior="scroll" direction="down" style="position:absolute; left:698px; top:160px; width:16px; height:250px; z-index:1;" scrollamount="4"><span class="falling1"><img src="http://www.allblogtools.com/imgup/12-2008/uploaded/heart3.gif"/></span></marquee>

<marquee behavior="scroll" direction="down" style="position:absolute; left:726px; top:200px; width:16px; height:382px; z-index:1;" scrollamount="1"><span class="falling2"><img src="http://www.allblogtools.com/imgup/12-2008/uploaded/heart3.gif"/></span></marquee>

<marquee behavior="scroll" direction="down" style="position:absolute; left:754px; top:150px; width:16px; height:542px; z-index:1;" scrollamount="1"><span class="falling1"><img src="http://www.allblogtools.com/imgup/12-2008/uploaded/heart3.gif"/></span></marquee>

<marquee behavior="scroll" direction="down" style="position:absolute; left:780px; top:180px; width:16px; height:437px; z-index:1;" scrollamount="2"><span class="falling2"><img src="http://www.allblogtools.com/imgup/12-2008/uploaded/heart3.gif"/></span></marquee>


<a style="color: #000080; font-family: tahoma; font-size: 11px; text-decoration: none; border: 1px double #00ADEF; padding: 1px; background: #FFF" target="_blank" href="http://www.allblogtools.com/">

Get Blogger Falling Hearts</a>


၃။ Save လုပ္ပါ။ ထို Gedgetကို Sidebarေအာက္ေျခတြင္ထားပါ။
၄။ Save ထပ္လုပ္ပါ။
ဆက္ဖတ္ရန္

Adding Falling Star For Blogger

လာျပန္ၿပီ Blogging. ေတာင္းဆိုခ်က္ေတြမ်ားတယ္။ အရင္တစ္ေခါက္ကတင္တဲ့ Snow Effectsက Blog Pageကို ေလးေစတယ္တဲ့။ ဒါ့ေၾကာင့္ ဒီထက္ သြက္လပ္ၿပီး ေပါ့ပါးတဲ့ Falling Objectsေတြ ထပ္လိုခ်င္တယ္တဲ့။ ဒါေၾကာင့္ ဒီ Postကို ထပ္တင္လိုက္ပါတယ္။

Animated
ၾကည္ေလးေတြ Blog Pageေပၚမွာ ဖြင့္လိုက္တိုင္း အလိုလိုနဲ႔ က်လာေအာင္ ထည့္လိုက္ၾကစို႔။ ပံုစံကို Blogမွာ ၾကည့္ႏိုင္ပါတယ္။

၁။ Blogger Sign In> Layout > Page Elements > Add a gadget >HTML/JavaScriptေခၚပါ။
၂။ ေအာက္ပါ Codeကို ကူးယူ၍ Pasteလုပ္ပါ။


<a style="color: #000080; font-family: tahoma; font-size: 11px; text-decoration: none; border: 1px double #00ADEF; padding: 1px; background: #FFF" target="_blank" href="http://www.allblogtools.com/">Get Blogger Falling Objects</a>

<div align="center">

<marquee behavior="scroll" direction="down" style="position:absolute; left:110px; top:150px; width:16px; height:483px; z-index:1;" scrollamount="3"><span class="falling1"><img src="http://www.allblogtools.com/imgup/1-2009/uploaded/AllBlogTools.com.gif"/></span></marquee>

<marquee behavior="scroll" direction="down" style="position:absolute; left:169px; top:170px; width:16px; height:411px; z-index:1;" scrollamount="2"><span class="falling2"><img src="http://www.allblogtools.com/imgup/1-2009/uploaded/AllBlogTools.com.gif"/></span></marquee>

<marquee behavior="scroll" direction="down" style="position:absolute; left:213px; top:190px; width:16px; height:346px; z-index:1;" scrollamount="3"><span class="falling1"><img src="http://www.allblogtools.com/imgup/1-2009/uploaded/AllBlogTools.com.gif"/></span></marquee>

<marquee behavior="scroll" direction="down" style="position:absolute; left:279px; top:180px; width:16px; height:512px; z-index:1;" scrollamount="1"><span class="falling2"><img src="http://www.allblogtools.com/imgup/1-2009/uploaded/AllBlogTools.com.gif"/></span></marquee>

<marquee behavior="scroll" direction="down" style="position:absolute; left:310px; top:160px; width:16px; height:428px; z-index:1;" scrollamount="7"><span class="falling1"><img src="http://www.allblogtools.com/imgup/1-2009/uploaded/AllBlogTools.com.gif"/></span></marquee>

<marquee behavior="scroll" direction="down" style="position:absolute; left:250px; top:190px; width:16px; height:206px; z-index:1;" scrollamount="5"><span class="falling2"><img src="http://www.allblogtools.com/imgup/1-2009/uploaded/AllBlogTools.com.gif"/></span></marquee>

<marquee behavior="scroll" direction="down" style="position:absolute; left:148px; top:150px; width:16px; height:287px; z-index:1;" scrollamount="7"><span class="falling1"><img src="http://www.allblogtools.com/imgup/1-2009/uploaded/AllBlogTools.com.gif"/></span></marquee>

<marquee behavior="scroll" direction="down" style="position:absolute; left:297px; top:170px; width:16px; height:239px; z-index:1;" scrollamount="6"><span class="falling2"><img src="http://www.allblogtools.com/imgup/1-2009/uploaded/AllBlogTools.com.gif"/></span></marquee>

<marquee behavior="scroll" direction="down" style="position:absolute; left:110px; top:230px; width:16px; height:254px; z-index:1;" scrollamount="7"><span class="falling1"><img src="http://www.allblogtools.com/imgup/1-2009/uploaded/AllBlogTools.com.gif"/></span></marquee>

<marquee behavior="scroll" direction="down" style="position:absolute; left:369px; top:190px; width:16px; height:420px; z-index:1;" scrollamount="3"><span class="falling2"><img src="http://www.allblogtools.com/imgup/1-2009/uploaded/AllBlogTools.com.gif"/></span></marquee>

<marquee behavior="scroll" direction="down" style="position:absolute; left:385px; top:150px; width:16px; height:520px; z-index:1;" scrollamount="3"><span class="falling1"><img src="http://www.allblogtools.com/imgup/1-2009/uploaded/AllBlogTools.com.gif"/></span></marquee>

<marquee behavior="scroll" direction="down" style="position:absolute; left:441px; top:170px; width:16px; height:381px; z-index:1;" scrollamount="4"><span class="falling2"><img src="http://www.allblogtools.com/imgup/1-2009/uploaded/AllBlogTools.com.gif"/></span></marquee>

<marquee behavior="scroll" direction="down" style="position:absolute; left:477px; top:200px; width:16px; height:392px; z-index:1;" scrollamount="7"><span class="falling1"><img src="http://www.allblogtools.com/imgup/1-2009/uploaded/AllBlogTools.com.gif"/></span></marquee>

<marquee behavior="scroll" direction="down" style="position:absolute; left:569px; top:170px; width:16px; height:485px; z-index:1;" scrollamount="6"><span class="falling2"><img src="http://www.allblogtools.com/imgup/1-2009/uploaded/AllBlogTools.com.gif"/></span></marquee>

<marquee behavior="scroll" direction="down" style="position:absolute; left:599px; top:200px; width:16px; height:386px; z-index:1;" scrollamount="3"><span class="falling1"><img src="http://www.allblogtools.com/imgup/1-2009/uploaded/AllBlogTools.com.gif"/></span></marquee>

<marquee behavior="scroll" direction="down" style="position:absolute; left:530px; top:170px; width:16px; height:383px; z-index:1;" scrollamount="1"><span class="falling2"><img src="http://www.allblogtools.com/imgup/1-2009/uploaded/AllBlogTools.com.gif"/></span></marquee>

<marquee behavior="scroll" direction="down" style="position:absolute; left:608px; top:200px; width:16px; height:347px; z-index:1;" scrollamount="1"><span class="falling1"><img src="http://www.allblogtools.com/imgup/1-2009/uploaded/AllBlogTools.com.gif"/></span></marquee>

<marquee behavior="scroll" direction="down" style="position:absolute; left:642px; top:250px; width:16px; height:435px; z-index:1;" scrollamount="7"><span class="falling2"><img src="http://www.allblogtools.com/imgup/1-2009/uploaded/AllBlogTools.com.gif"/></span></marquee>

<marquee behavior="scroll" direction="down" style="position:absolute; left:681px; top:290px; width:16px; height:499px; z-index:1;" scrollamount="3"><span class="falling1"><img src="http://www.allblogtools.com/imgup/1-2009/uploaded/AllBlogTools.com.gif"/></span></marquee>

<marquee behavior="scroll" direction="down" style="position:absolute; left:659px; top:180px; width:16px; height:222px; z-index:1;" scrollamount="7"><span class="falling2"><img src="http://www.allblogtools.com/imgup/1-2009/uploaded/AllBlogTools.com.gif"/></span></marquee>

<marquee behavior="scroll" direction="down" style="position:absolute; left:698px; top:160px; width:16px; height:250px; z-index:1;" scrollamount="4"><span class="falling1"><img src="http://www.allblogtools.com/imgup/1-2009/uploaded/AllBlogTools.com.gif"/></span></marquee>

<marquee behavior="scroll" direction="down" style="position:absolute; left:726px; top:200px; width:16px; height:382px; z-index:1;" scrollamount="1"><span class="falling2"><img src="http://www.allblogtools.com/imgup/1-2009/uploaded/AllBlogTools.com.gif"/></span></marquee>

<marquee behavior="scroll" direction="down" style="position:absolute; left:754px; top:150px; width:16px; height:542px; z-index:1;" scrollamount="1"><span class="falling1"><img src="http://www.allblogtools.com/imgup/1-2009/uploaded/AllBlogTools.com.gif"/></span></marquee>

<marquee behavior="scroll" direction="down" style="position:absolute; left:780px; top:180px; width:16px; height:437px; z-index:1;" scrollamount="2"><span class="falling2"><img src="http://www.allblogtools.com/imgup/1-2009/uploaded/AllBlogTools.com.gif"/></span></marquee>

</div>


၃။ Save လုပ္ပါ။ ထို Gedgetကို Sidebarေအာက္ေျခတြင္ထားပါ။
၄။ Save ထပ္လုပ္ပါ။

ဆက္ဖတ္ရန္

July 27, 2009

Blog Pageတြင္ အေပၚတက္ရန္ (သို႔) Back toTop Botton ထည့္လိုပါက

Blog Pageတြင္ အေပၚတက္ရန္ (သို႔ ) Back toTop Bottonေလး ထည့္လိုလွ်င္ ေအာက္ပါ Codeကို ထည့္ပါ။
<a style="display:scroll;position:fixed;bottom:5px;right:5px;" href="#" title="Back to Top"><img src="YOUR IMAGE LINK HERE" /></a>

ထို Codeအားထည့္ရန္
၁။ Blogger Sign In> Layout > Page Elements > Add a gedget > HTML/ JavaScriptကို ေခၚပါ။
၂။ ကူးယူထားေသာ Codeအား ထည့္သြင္းလိုက္ပါ။
၃။ YOUR IMAGE LINK HEREေနရာတြင္ မိမိထည့္လိုေသာ Up Arrowကို ထည့္ႏိုင္ပါသည္။
၄။ ေအာက္ပါ Buttonမ်ားကိုလည္း ထည့္ႏိုင္ပါသည္။ ပံုကို Righ-clickႏွိပ္ၿပီး Address (URL)ကို Copyလုပ္၍ ထည့္ႏိုင္ပါသည္။ Search Engineတြင္လည္း ရွာယူႏုိင္ပါသည္။

ဆက္ဖတ္ရန္

July 25, 2009

သင္၏ Blog URLအား Search Engineထဲသို႔ တင္ပို႔လိုပါသလား

အကယ္၍ သင္သည္ မိမိ၏ Blogအတြက္ Good Trafficလိုခ်င္ပါက မိမိ၏ Blog URLအား Search Engineထဲသို႔ တင္ပို႔ပါက ေကာင္းေသာ လုပ္ေဆာင္ခ်က္သာ ျဖစ္ပါသည္။ မိမိ၏ Blog URLအား Search Engineထဲသို႔ တင္ပို႔လိုက္ျခင္းအားျဖင့္ ထို Search Engineမ်ားမွတဆင့္ မိမိ၏ Blogအား အလြယ္တကူရွာႏိုင္ပါသည္။ ေၾကျငာၿပီးသား ျဖစ္လိမ့္မည္။ လုပ္သင့္လုပ္ထိုက္ေသာ Tipတစ္ခုသာျဖစ္သည္။

ထိုကဲ့သို႔ Submittingလုပ္လိုပါက ေအာက္ပါ Websitsမ်ားမွ Submitလုပ္ႏိုင္ပါသည္။

၁။ Submit Express
၂။ Free Web Submission
၃။ My Page Rant

လုပ္ေဆာင္ခ်က္ အဆင့္ဆင့္ကို မတင္ျပေတာ့ပါ။ ယင္း Websiteမ်ား၏ အဆင့္မ်ားအတိုင္း လိုက္နာပါ။

ဆက္ဖတ္ရန္

Scroll Bar/ Boxျဖင့္ Bloggerတြင္ Postတင္မယ္

Scroll Bar/ Boxသည္ မိမိ၏ Webpageအား ေနရာယူမွဳ နည္းပါးၿပီး တစ္ခ်ိန္တည္းျဖင့္ Postတစ္ခုကို Scrollလုပ္ရံုျဖင့္ အလြယ္တကူ ဖတ္ႏိုင္ပါသည္။ ဤအေၾကာင္းအရာကိုတင္ဖို႔ ေတာင္းဆိုလာေသာေၾကာင့္ တမ်ိဳးတဖံု အက်ိဳးရွိမလားဆိုၿပီး တင္ျဖစ္လိုက္ပါတယ္။ အမွန္တကယ္လည္း အသံုး၀င္ပါတယ္။

ဒါဆို ထည့္ၾကရေအာင္..

၁။ Blogger ထဲသို႔ Sign In၀င္ပါ။
၂။ Dashboard > New Postကို ေခၚပါ။
၃။ ေအာက္ပါ Codeကို Post boxတြင္ သြင္းလိုက္ပါ။


<div style="overflow:auto;width:300px;height:200px;padding:10px;border:1px solid #eee">Your Text here here!</div>


၄။ Your Text Hereေနရာတြင္ မိမိထည့္လိုေသာ အေၾကာင္းအရာမ်ားအား အျပည့္အစံုထည့္လိုက္ပါ။
၅။ Publish Postလုပ္လိုက္ပါ။ ၿပီးပါၿပီ။

Example:

ငါးဖယ္ဆီၿပန္ ခ်က္နည္း

ပါ၀င္ပစၥည္းမ်ား
- ငါးဖယ္ၿခစ္ (ထုိင္းမွ၀ယ္လာသည္)
- ၾကက္သြန္နီ၊ၿဖဴ
- ခရမ္းခ်ဥ္သီး
- နံနံပင္
- မက်ည္းသီးမွည္.


ခ်က္နည္း
- ငါးဖယ္ၿခစ္ကုိ ဆား၊အခ်ိဳမုန္.နဲ.နယ္ၿပီး ေၾကာ္ပါ။
- ဆီပူလွ်င္ ၾကက္သြန္နီ၊ၿဖဴ ကုိေၾကာ္ပါ။ ငရုတ္သီးမူန္.အနည္းငယ္ထည္.ပါ။
- ၾကက္သြန္မ်ားႏြမ္းသြားလွ်င္ ခရမ္းခ်ဥ္သီးထည္.ေၾကာ္ပါ။
- မက်ည္းမွည္. ရည္ ကုိ အနည္းငယ္ထည္.ပါ။
- ခရမ္းခ်ဥ္သီး ေၾကသြားရင္ ခုနက ေၾကာ္ထားတဲ. ငါးဖယ္ေတြကုိေရာၿပီးေၾကာ္လုိက္ပါ။
- ရခါနီးရင္ နံနံပင္ အုပ္ေပးလုိက္ပါေနာ္။


မွတ္ခ်က္။ Scroll Bar/ Boxအား ခ်ဲ႔လိုပါက WIDTH: 300 ႏွင့္ HEIGHT:200တြင္ တန္ဖိုးထပ္တိုးႏိုင္ပါသည္။
ဆက္ဖတ္ရန္

July 24, 2009

How to Install the Netbeui Protocol on a XP-Based Computer


This article describes how to install the NetBEUI protocol on a Windows XP-based computer. This may be useful because the NetBEUI protocol is not included in the list of installable protocols in Windows XP even though the files that are needed to install the protocol are included with the installation CD-ROM. It is important to note that the NetBEUI protocol is not supported on Windows XP.
The Netnbf.inf and Nbf.sys files are the files that are needed to install the NetBEUI protocol. To install the NetBEUI protocol:
1. Click Start, click Control Panel, and then double-click Network Connections.
2. Right-click the adapter you want to add NetBEUI to, and then click Properties.
3. On the General tab, click Install.
4. Click Protocol, and then click Add.
5. Click Have Disk, insert your Windows XP CD-ROM, open the Valueadd\msft\net\netbeui folder, click the Netnbf.inf file, and then click Open.
6. Click OK, and then click OK to complete the installation.


ဆက္ဖတ္ရန္

Remove shortcut arrow from desktop icons


If you would like to remove the shortcut arrows from your desktop icons, here's how:
Warning: The following tip requires a registry edit. Mistakes made in the Windows registry can cause serious problems with your operating system. Be sure to make a backup copy of your registry prior to making any changes.

1. Go to Start>> Run. Type in: regedit [Enter] or click OK.
2. Drill down to the following registry key: or you can find it

HKEY_CLASSES_ROOT\lnkfile

3. Delete the IsShortcut registry value.

Note: This may require a system restart.
ဆက္ဖတ္ရန္

July 22, 2009

မိမိ၏ Folderအား တျခား Userဖြင့္၍မရေအာင္ Privateလုပ္ထားမယ္။

သင္အသံုးျပဳေနေသာ ကြန္ပ်ဴတာသည္ User (၂)ခု (သို႔) (၂)ခုထက္ပိုရွိေနပါက သင္၏ File Foldersမ်ားအား Privateလုပ္ထားသင့္သည္။ မိမိ၏ အခ်က္အလက္သည္ ပုဂၢိဳလ္ေရးအရ၊ လုပ္ငန္းအရ လံုျခံဳမွဳရွိရမည္။ သို႔မွသာ သူခိုး၊ ဂ်ပိုးမ်ား လာေႏွာင့္ယွက္၍ မရႏိုင္ပါ။ ရိုင္းသြားသလား မသိဘူး။ ရိုင္းသြားရင္ ခြင့္လြတ္ေနာ္။ သူငယ္ခ်င္းတစ္ေယာက္က Windowsသိပ္မကၽြမ္းက်င္ေသးေတာ့ ဒီလိုျဖစ္ရပ္ေတြ ၾကံဳေနလို႔ အကူအညီလာေတာင္းခဲ့ပါတယ္။ ဒါကို ဒီလိုလုပ္ခိုင္းလိုက္ပါတယ္။

အဆင့္မ်ား -

၁။ ဦးစြာ User ရွိတဲ့ ေနရာ Windows Systemရွိတဲ့ Local Dsik (C)ထဲကို ၀င္ပါ။
၂။ အကယ္၍ Local Disk (C)သည္ Hiddenျဖစ္ေနပါက Show the contents of this folderကိုႏွိပ္လိုက္ပါ။


၃။ ထို႔ေနာက္ Documents and Setting ထဲသို႔ Double clickျဖင့္ ၀င္ေရာက္ပါ။


၄။ ယင္းေနာက္ မိမိ၏ User folderကို ဖြင့္လိုက္ပါ။ မိမိ၏ User Nameကို သိလိုက Start Menuတြင္ ၀င္ၾကည့္လိုက္ပါ။


၅။ မိမိ Privateလုပ္လိုေသာ Folder ေပၚတြင္ R-clickႏွိပ္ၿပီး Propertiesကိုႏွိပ္ပါ။ ၆။ Properties Dialog boxမွ Sharing Tabကိုႏွိပ္ၿပီး Local Sharing and Security Optionေအာက္မွ Make this folder private check boxကို အမွန္ျခစ္ျပလိုက္ပါ။


၇။ ထို႔ေနာက္ Apply > Okႏွိပ္ပါ။


မွတ္ခ်က္။ ။ ဤလုပ္ေဆာင္ခ်က္သည္ မိမိ၏ User Profileထဲတြင္ရွိေသာ Folderမ်ားကိုသာ လုပ္၍ရႏိုင္ပါသည္။ သင္၏ User Profileထဲတြင္ My Documents and its subfolders, Desktop, Start Menu, Cookies, and Favorites Foldersမ်ားသာရွိပါသည္။ အကယ္၍သင္သည္ ယင္းတို႔အား Privateမလုပ္ထားပါက မိမိကြန္ပ်ဴတာအား အသံုးျပဳေသာ မည္သူမဆို ယင္း Foldersမ်ားအား ဖြင့္ၾကည့္ႏိုင္ပါသည္။ မိမိ Folderအား Privateလုပ္ထားပါက ဥပမာ - My Documents - My Documentထဲတြင္ရွိေသာ File, Sub-folder မ်ားျဖစ္ၾကသည့္ My Music and My Pictures folderမ်ားကိုလည္း Privateထားမည္ျဖစ္သည္။ အကယ္၍ မိမိ၏ Driveသည္ NTFS - New Technology File System ျဖင့္ မေျပာင္းထားပါက၊ အသံုးမျပဳထားပါက မိမိ၏ Folderအား Privateလုပ္၍ မရပါ။
ဆက္ဖတ္ရန္

Desktop Iconကို Transparent ျဖစ္ေအာင္ ျပန္လုပ္မယ္။

တပည့္တစ္ေယာက္က သူ႔ရဲ့ Windows Desktopမွာ Iconစာသားေတြက ေနာက္ခံအျပာေရာင္နဲ႔ ျပေနတယ္။ ဘယ္လိုလုပ္ရမလဲဆိုတာ Emailနဲ႔ ေမးလာတယ္။ ကၽြန္ေတာ္က ျပန္ေျဖၾကားလိုက္ပါတယ္။ အရင္က ဒီလိုျပသနာကိုလည္း အၾကိမ္ေပါင္းမ်ားစြာ ေျဖရွင္းခဲ့ဖူးပါတယ္။ လြယ္လြယ္ေလးပါ။နည္း (၁)

  • Go to ontrol Panel > System, > Advanced > Performance areaမွ Settings buttonကိုႏွိပ္ပါ။
  • Visual Effects tabမွ "Use drop shadows for icon labels on the Desktop"ကို အမွန္ျခစ္ျပလိုက္ပါ။
  • Apply > OK ႏွိပ္ပါ။

နည္း (၂)


  • Desktopမွာ ရွိတဲ့ My Computer iconေပၚမွာ Right-Clickႏွိပ္ၿပီး Propertiesကိုႏွိပ္ပါ။
  • Advanced tabမွ Performanceေအာက္တြင္ Setting buttonကို ႏွိပ္ပါ။
  • Dialog boxေနာက္တစ္ခုတြင္ Visual Effects tabမွ "Use drop shadows for icon labels on the Desktopကို အမွန္ျခစ္ျပလိုက္ပါ။
  • Apply > OK ႏွိပ္ပါ။
ဆက္ဖတ္ရန္

July 21, 2009

Blog Postမ်ားအား Right-clickလုပ္ၿပီး ကူးယူ၍ မရေအာင္ ကန္႔သတ္လိုပါက

ဤ Postသည္ HTML (JavaScript)ကို အသုံးျပဳ၍ မည္သည့္ Blog Page (သို႔) Webpageမဆို Postမ်ား Righg-clickလုပ္ၿပီး ကူးယူ၍ မရေအာင္ မည္ကဲ့သို႔ ကန္႔သတ္မည္ကုိ တင္ျပမည္ျဖစ္သည္။

မိမိ Blogထဲသို႔ ၀င္ေရာက္လာေသာ စာဖတ္သူမ်ား၊ တစ္စံုတစ္ေယာက္က မိမိ၏ စာသားမ်ား၊ ဓါတ္ပံုမ်ားႏွင့္ အျခားေသာ မိမိကိုယ္ပိုင္၊ ကိုယ္တိုင္ျပဳလုပ္ထားေသာ မည္သည့္အေၾကာင္းအရာကိုမဆို ယူလိုပါက ယူလို႔မရေအာင္ ျပဳလုပ္ထားျခင္းျဖစ္သည္။ သို႔ေသာ္ ဤကဲ့သို႔ျပဳလုပ္ထားျခင္းသည္ မွန္ကန္ေသာလုပ္ရပ္မဟုတ္ပါ။ အဘယ္ေၾကာင့္ဆိုေသာ္ မိမိ Blogထဲသို႔ ၀င္ေရာက္လာေသာ စာဖတ္သူမ်ား မိမိ၏ Information, imageစသည္တို႔ကို လာေရာက္ဖတ္ရွဳ ၾကည့္ရွဳရံုရန္သာရွိၿပီး ရာခိုင္ႏွဳန္းနည္းပါေသာ စာဖတ္သူမ်ား ရွိပါလိမ့္မည္။ ထိုသို႔ ကန္႔သတ္လိုက္ပါက စာဖတ္သူမ်ား စိတ္ဆိုးသြားမည္ျဖစ္ၿပီး မလုပ္သင့္ေသာ အရာသာျဖစ္သည္။
အကယ္၍ ဓါတ္ပံုမ်ား ကန္႔သတ္လိုပါက ထိုဓါတ္ပံုတြင္ မိမိ၏ မူပိုင္အမည္ (သို႔) လိပ္စာကို တပ္ျခင္း ေရးသားထားျခင္းျဖင့္ ပို၍ သင့္ေလ်ာ္မည္ျဖစ္သည္။ ဒါကေတာ့ ပုဂၢိဳလ္ေရးႏွင့္သာ ဆိုင္ပါသည္။

ဤကဲ့သို႔ေသာ ျဖစ္ရပ္တစ္ခုရွိခဲ့တယ္။ ကၽြန္ေတာ့္သူငယ္ခ်င္းတစ္ေယာက္ရွိတယ္။ သူက ဓါတ္ပံုဆရာ။ ဓါတ္ပံုေတြလိုက္ရိုက္ၿပီး Blogထဲမွာ တင္တယ္။ သူက ဓါတ္ပံုေတြကို Plainတင္တယ္။ တျခား သူငယ္ခ်င္းတစ္ေယာက္က သူ႔ဓါတ္ပံုကိုယူၿပီး Blogထဲမွာ ထပ္တင္တယ္။ အဲဒီမွာ ျပသနာက တက္ေတာ့တာပဲ။ ကၽြန္ေတာ္အၾကံေပးလိုက္တယ္။ ကူးယူခြင့္ေပးမယ္ ဒါေပမယ့္ ဓါတ္ပံုေပၚမွာ မူပိုင္ (သို႔) လိပ္စာတပ္မယ္။ ဓါတ္ပံုကို လံုး၀ကူးယူခြင့္ မေပးခ်င္ရင္ေတာ့ ဤနည္းကိုသံုးခိုင္းလိုက္တယ္။ ဒါနဲ႔ သူ႔ရဲ့အားနည္းခ်က္ကို သူသိလိုက္တာေပါ့။

အကယ္၍ သင္လည္းပဲ ကူးယူခြင့္ မေပးလိုပါက ဤ Code Linkကို ကူးယူႏိုင္ပါသည္။


အဲဒီ Codeကို ဘယ္လိုထည့္သြင္းမွာလဲ...
  • Sign in to your blogger dashboad > Layout> Page Elements > Add a Gedget >HTML(JavaScript)
  • Copyလုပ္ထားေသာ Javascript codeကို Pasteလုပ္လိုက္ပါ။
  • Save လုပ္ပါ။ ဒါဆိုရင္ ၿပိးပါၿပီ။

ဆက္ဖတ္ရန္

July 19, 2009

Alert Message and Dialog Box အား Bloggerဖြင့္တိုင္း ေပၚေစလိုက

မိမိ၏စာဖတ္ပရိတ္သတ္အား မိမိ Blogထဲ မ၀င္ေရာက္ခင္ မိမိေပးလိုေသာ အထူးေၾကျငာခ်က္, Information မ်ားႏွင့္ အသိေပးစာမ်ားကို Dialog Boxအျဖစ္ ေပးေပၚေစႏိုင္ပါသည္။ ယင္းကို Pop up boxဟုလည္း ေခၚေ၀ၚပါသည္။ ထို Boxတြင္ မိမိ၏ Messageမ်ားႏွင့္ စာဖတ္သူမ်ား အတည္ျပဳႏိုင္ရန္ "OK" bottonေလးမ်ားပါ၀င္ပါသည္။ သည့္အျပင္ "OK"ႏွိပ္ပါက Website/ Blogတစ္ခုႏွင့္ ဆက္သြယ္ထားၿပီး "Cancal"ႏွိပ္ပါက တျခား Website/ Blogတစ္ခုသို႔သြားရန္ ညြန္းႏိုင္ပါသည္။ ယင္းအျပင္ စာဖတ္သူမ်ား၏ အမည္ႏွင့္ အခ်က္အလက္မ်ားကိုလည္း Message Boxတြင္ ေမးျမန္းႏိုင္ပါသည္။ ဤလုပ္ေဆာင္ခ်က္ JavaScript သည္ မိမိ၏Blogထဲတြင္ Alert Message and Dialog Boxအား မည္ကဲ့သို႔ ထည့္ႏိုင္မည္ကို တင္ျပသြားပါမည္။

Alert Box with OK button - OK buttonျဖင့္ ၀င္ခိုင္းသည့္ Alert Message Box


ကန္႔သတ္ခ်က္ရွိေသာ Sites/ Blogမ်ားအတြက္ Serious Message Boxမ်ားျဖင့္ ေမးေလ့ရွိသည္။ တခ်ိဳ႔ Sites/ Blogမ်ားမွာ ၾကိဳဆိုမွဳ၊ ေက်းဇူးတင္ေၾကာင္း ေဖာ္ျပလိုမွဳ စသည့္ရည္ရြယ္ခ်က္မ်ားျဖင့္ တင္ျပေလ့ရွိသည္။

Alert Box with OK buttonကို ဖန္တီးလိုပါက.
၁။ Blogger ထဲ Sign In၀င္ပါ။ Page Elementsမွ New Gedgetကို ေခၚပါ။ HTML/ JavaScriptကို Addလုပ္ပါ။
၂။ ေအာက္ပါ JavaScript Codeကို ကူးယူၿပီး ထည့္သြင္းလိုက္ပါ။

<script type="text/javascript">
alert(
'You are about to enter an extremely funny site. People who are prone to laughing fits ... Beware!')
</script>
<noscript>Enable javascript in your browser to view an important message.</noscript>

You are about to enter an extremely funny site. People who are prone to alughing fits...Beware!
စာသားေနရာတြင္ မိမိထည့္လိုေသာ စာသားအား ထည့္လိုက္ပါ။

၃။ Save လုပ္ပါ။

--------------------------------------------------------------------------
Alert Box with Confirmation button - အတည္ျပဳခိုင္သည့္ Alert Message Box


ဒါနဲ႔ ပတ္သတ္ၿပီး Buttonႏွစ္ခုျဖင့္ ေရြးခ်ယ္ခိုင္းပါမည္။ Ok buttonသည့္ အတည္ျပဳက ဤ Site/Blogထဲကို ၀င္မည္။ Cancal buttonသည့္ အတည္မျပဳက တျခား site/Blogျဖင့္ သြားခိုင္းမည္။ အဲဒီအတြက္ Website/ Blog linkကို ထည့္သြင္းရမည္ျဖစ္သည္။

၁။ Blogger ထဲ Sign In၀င္ပါ။ Page Elementsမွ New Gedgetကို ေခၚပါ။ HTML/ JavaScriptကို Addလုပ္ပါ။
၂။ ေအာက္ပါ JavaScript Codeကို ကူးယူၿပီး ထည့္သြင္းလိုက္ပါ။

<script type="text/javascript">
confirm(
'This site contains explicit contents. Are you sure you want to continue?');
if (confirm('This site contains explicit contents. Are you sure you want to continue?')) {
window.location
= "http://tips-for-new-bloggers.blogspot.com/";
}
else {
window.location
= "http://www.google.com/";
}
</script>
confirm('This site contains explicit contents. Are you sure you want to continue?'
confirmသည့္ စာဖတ္သူက အနီေရာင္စာသားကို ဖတ္ၿပီး oK buttonႏွိပ္ရန္ ရည္ညြန္းသည္။

if (confirm(This site contains explicit contents. Are you sure you want to continue?
if confirmသည္ စာဖတ္သူက oKႏွိပ္ၿပီး ေနာက္တစ္ဆင့္ ထပ္ႏွိပ္ရန္ အတည္ျပဳခိုင္းမည္။ စာသားေျပာင္းထည့္ႏိုင္သည္။

window locationသည္ oKႏွိပ္က ၀င္ေရာက္မည့္ site/ Blogလိပ္စာကို ထည့္သြင္းေပးရမည္ျဖစ္သည္။
ဒုတိယ window locationသည္ Cancalႏွိပ္ၿပီး ၀င္ေရာက္မည့္ site/Blogလိပ္စာကို ထည့္သြင္းေပးရမည္ ျဖစ္သည္။

၃။ Save ႏွိပ္ပါ။

----------------------------------------------------------------------------

Alert Box with Prompt field - ေမးခြန္းျဖင့္ စာဖတ္သူ အမည္၊ အေၾကာင္းအရာျဖင့္ ၀င္ေရာက္မွဳ

ဒါက စာဖတ္သူအား informationေတာင္းသည့္ Message fieldျဖစ္သည္။
၁။ Blogger ထဲ Sign In၀င္ပါ။ Page Elementsမွ New Gedgetကို ေခၚပါ။ HTML/ JavaScriptကို Addလုပ္ပါ။
၂။ ေအာက္ပါ JavaScript Codeကို ကူးယူၿပီး ထည့္သြင္းလိုက္ပါ။
<script type="text/javascript">
var yourName = prompt("How can we address you?", "Reader");
</script>
How can we address you? တြင္ မိမိထည့္လိုေသာ Question
၃။ Saveႏွိပ္လိုက္ပါ။

ဆက္ဖတ္ရန္

July 18, 2009

ကမာၻေပၚမွာ႐ိွတဲ့ ႐ိွ႐ိွသမွ် ေဆာ့၀ဲ၊ ဂိမ္းနဲ ့ ဖိုင္အမ်ိဳးမ်ိဳး ဒီမွာအလကားရမယ္

သိပ္စိတ္၀င္စားစရာေကာင္းပါတယ္။ Downloadလုပ္လို႔ရတဲ့ ဗိမာန္ေလးကို၀င္ဖို႔ လမ္းညြန္ထားပါတယ္။ ဒီဗိမာန္မ်ားကို ေပးတဲ့သူက ကိုဘိတ္သားပါ။ သူက ျမန္မာအိုင္အာစီႏွင့္ ျမန္မာစကား၀ိုင္းမွာ ေဖာ္ျပထားပါတယ္။ နာမည္ၾကီး Download siteေတြကို ပညာသားပါပါနဲ႔ ယူထားပါတယ္တဲ့။ ဒါကို သူက Hackလုပ္တယ္လို႔ ၾကြားေပါက္ဟထားပါတယ္။ ဒါဆို သူက Hackerေပါ့။ Hackerဆို ကၽြန္ေတာ္လည္း ေၾကာက္ပါတယ္။ ယံုးမလားေတာ့ မသိဘူး။ ျမည္းၾကည့္ၿပီးပါၿပီ။ သိပ္အရသာ ေကာင္းပါတယ္။ သူငယ္ခ်င္းတို႔ကိုလည္း ျမည့္ၾကည့္ဖို႔ ေ၀မွ်လိုက္ပါတယ္။ ေအာ့ ေမ့ေနတယ္။ ၾကြားေပါက္က ေကာင္းလိုက္တာ။ ၁၀၀% အာမခံတဲ့။ ေကာင္းမေကာင္း သင္၀င္မွ သိရမွာပါ။
No.Download SitesUser Name and Password
1.http://www.divxcrawler.com/ {download movies fastly}Username : divx273
Password : 8342729
2.http://www.butterflydownloadnetwork.com/ {movies, music, Pc Games, Tv shows}Username : cinemanetwork20
Password : butterfly20
3.http://www.downloadprofessional.com/ {movies,Pc softwares, Pc Games, Tv shows}Username : lo886Ees
Password : zAgt88er
4.http://www.sharingzone.net/ {movies, Pc softwares, Pc Games}Username : LODMQYHX
Password : 375021402
Receipt : 4T5W89RD
5.http://www.unlimitedgamedownloads.com/ {movies, Pc Games, psp softwares}Username : ga20me
Password : ke01feb
6.http://www.watchdirect.tv/ {movies, music, Pc Games, online Tv}Username : cinemanetwork20
Password : butterfly20
7.http://www.fullreleasez.com/ {Greatly Every thing}Username : Af872HskL
Password : XjsdH28N
8.http://www.fulldownloads.us/ {Greatly Every thing}Username : Af872HskL
Password : XjsdH28N
9.http://www.pirateaccess.com/ {Every thing}Username : yourfrienddalat@gmail.com
Password : CHh5LKPI

Username : xxx_heel_xxx@yahoo.com
Password : MJY0BUY

Username : i_l0ve_u_786@yahoo.com
Password : rYvLgPrt

Username : mubashar_siddique@yahoo.com
Password : F9Gzgwb5
10.http://www.warezquality.com/ {Every thing}Username : ageg2020
Password : z8fsDfg3
11.http://www.warezreleases.com/ {All Stuff}Username : HnRPxKQz
Password : a59KBV7

Username : a25bipZP
Password : 1TeVnoJb

Username : SHYyJfWU
Password : P4K20uO
12.http://www.fulldownloadaccess.com/ {All Stuff}Username : mpuv3y
Password : umvpy3x
13.http://www.alphaload.com/ {All Stuff}
Username : AL3429352
Password : ykbcKTNS

Username : AL3429355
Password : RCHAbhKM

Username : AL3429350
Password : gMZNFcyS

Username : AL3429351
Password : cTAkWAxc

Username : AL3429352
Password : ykbcKTNS
14.http://www.gamedownloadnow.com/ {All Stuff} Username : ga20me
Password : ke01feb
15.http://www.unlimiteddownloadcenter.com/ {All Stuff}Username : cu20me
Password : ke01feb
16.http://www.tvadvanced.com/ {online Tv} Username : mv03dl
Password : frmvdl


ဟာ... ေမာသြားတာပဲ။

ဆက္ဖတ္ရန္

July 17, 2009

Newer Posts - Home - Older Posts၌ Animated ပံုထည့္စို႔

ကၽြန္ေတာ္ ဒီ Postကို သိပ္စိတ္၀င္စားသြားပါတယ္။ ဒါေပမယ့္ ဒါကို ကၽြန္ေတာ္ကိုယ္တိုင္ မတင္ေတာ့ပါဘူး။ ကိုသံလံုငယ္တင္ထားတဲ့ Postအတိုင္း Linkေလးကို ေပးလိုက္ပါတယ္။ အသံုး၀င္မယ္လို႔ ထင္ပါတယ္။ သူ႔ရဲ့ လမ္းညြန္ခ်က္အတိုင္း လိုက္လုပ္ေတာ့ ဒီလိုပံုစံ ျဖစ္သြားပါတယ္။


ကိုသံလံုငယ္ကို ေက်းဇူးတင္ပါတယ္။

ရႊင္လန္းခ်မ္းေျမ့ပါေစ။
ဆက္ဖတ္ရန္

July 16, 2009

English - ျမန္မာ အဘိဓါန္ပါ။

Dictionary

အကယ္၍ Fileယူလိုက Download ကိုႏွိပ္ပါ။
ဆက္ဖတ္ရန္

Favicon ဆိုတာဘာလဲ? ဒါကို Blogထဲမွာ ဘယ္လိုထည့္မွာလဲ?

Faviconဆိုတာဘာလဲ?

Faviconဆိုတာ Web Broswer Windowရဲ့ Address နားမွာ ျဖစ္ျဖစ္ Tabမွာျဖစ္ျဖစ္ ေပၚေနတဲ့ Web/ Site/Blogအမည္ကို ကိုယ္စားျပဳ ရည္ညြန္းထားတဲ့ Iconပံုေလးသာျဖစ္သည္။ Website/ Blogတစ္ခုခုကို ၀င္ဖြင့္လိုက္သည္ႏွင့္ Faviconေလးသည့္ ထို Website/ Blog၏ လိပ္စာအေရွ႔တြင္ ေပၚမည္ျဖစ္သည္။

Faviconကို ဥပမာအရ ေျပာရရင္. က်ေနာ့္ Blogကိုဖြင့္လိုက္သည္ႏွင့္ လိပ္စာတြင္ ေအာက္ပါပံုေလးအတိုင္း ထြက္ေပၚလာမည္ျဖစ္သည္။


ဒါကို Blogထဲမွာ ထည့္လို႔ရပါသလား?
ဟုတ္ကဲ့ ထည့္ႏိုင္ပါတယ္။

ဒါဆို ဘယ္လိုထည့္မွာလဲ? နည္းျပေပးပါ။

ဟုတ္ကဲ့။ Faviconကို Bloggerထဲမွာ ထည့္မယ္ဆိုရင္ ေအာက္ပါအဆင့္မ်ားကို လုပ္ေဆာင္ပါ..

  • Faviconပံုေတြကို သင္ကိုယ္တိုင္ Image Editor/ Photo Editorျဖင့္ ဖန္တီးႏိုင္ပါသည္။ ဥပမာ - Photoshopစသည္ျဖင့္ ျပဳလုပ္ႏိုင္ပါသည္။ Internetထဲမွာလည္း ရွာႏိုင္ပါသည္။ မရွာပါနဲ႔ေတာ့။ အခု ကၽြန္ေတာ္ေပးတဲ့ Websiteမွ ယူႏိုင္ပါသည္။ ၄င္းတြင္ မိမိကိုယ္တိုင္လည္း ဖန္တီးႏိုင္ပါသည္။ ကၽြန္ေတာ္ကေတာ့ ျပင္းလို႔ သူေပးထားတဲ့ Lastest Faviconsကိုပဲယူပါတယ္။
  • ဦးစြာ Blogger > Layout > Edit HTML > Expand Widgetကို အမွန္ျခစ္ျပဖို႔ မေမ့ပါနဲ႔။
  • ထို႔ေနာက္ ေအာက္ပါ Codeကိုရွာပါ။
    <b:skin><![CDATA[/*

  • ေတြ႔ရွိပါက ယင္း Codeအေပၚတြင္ ေအာက္ပါ Codeကို ထည့္သြင္းလိုက္ပါ။
    <link href='Your Favicon URL' rel='shortcut icon'/>

  • ၄င္းေနာက္ Your Favicon URLေနရာတြင္ မိမိၾကိဳက္ႏွစ္သက္တဲ့ Faviconပံု၏ linkကို ထည့္သြင္းရမည္ျဖစ္သည္။ သြင္းရန္ ဤwebsiteကို ထပ္သြားပါ။ Latest Favicon ကိုႏွိပ္ပါ။
  • မိမိၾကိဳက္ႏွစ္သက္တဲ့ Faviconကိုႏွိပ္လိုက္ပါ။ ပံုအၾကီးႏွင့္ အေသးရွိပါသည္။ အေသးေပၚတြင္ Right-clickႏွိပ္ၿပီး Propertiesကိုႏွိပ္ပါ။
  • Location မွ Linkကို Selectလုပ္ၿပီး Copyလုပ္ပါ။
  • ေနာက္တဖန္ အထက္ပါ ေျပာျပထားသည့္အတိုင္း Your Favicon URLေနရာတြင္ မိမိ Copyလုပ္ထားေသာ Linkကို အစားထိုးသြင္းလိုက္ပါ။
  • Save Templateျဖင့္ အဆံုးသတ္ပါ။ ဒါဆို Faviconအေၾကာင္းကို သိသင့္သေလာက္ သိၿပီေပါ့။
ဆက္ဖတ္ရန္

July 15, 2009

Blog Postတြင္ Embeddable Code ထည့္စို႔

လာျပန္ၿပီး Postအသစ္။ အရင္တစ္ေခါက္က HTML Codeအား Blogger Post တြင္ ေပၚေစရန္ ေခါင္းစဥ္ျဖင့္ တင္ျပထားပါတယ္။ ထပ္ၿပီး အသစ္ေတြ႔ရွိပါသျဖင့္ ယခုတစ္ခါ ထပ္ဆင့္ တင္ျပလိုက္ပါတယ္။

ဦးစြာ..

  • ဤလင့္ ကိုႏွိပ္ပါ။
  • မိမိ Blogတြင္ ေပၚေစေသာ Codeအား Paste your code here: boxတြင္ သြင္းလိုက္ပါ။
  • ထို႔ေနာက္ မိမိလိုခ်င္ေသာ Languageကို ေရြးခ်ယ္ပါ။ ဥပမာ - HTMLေပါ့။
  • ထို႔ေနာက္ Submit bottonႏွိပ္ပါ။ ေနာက္ pageတစ္ခုထြက္လာမည္။
  • Your code will look like this on your site or Blog:သည္ Codeေပၚမည့္ပုံစံျဖစ္သည္။
  • Resize လုပ္ႏိုင္သည္။ Width ႏွင့္ Heightကို ေျပာင္းလိုက္ပါ။
  • Copy this to share your code in an email or IM conversation: လုပ္ႏိုင္သည္။
  • အဓိက လုပ္ရမွာက Copy this to embed your code in your blog or website: ျဖစ္သည္။
  • ထို Codeကို ကူးယူၿပီး မိမိ Blog Postတြင္ သြင္းလိုက္ရံုႏွင့္ Postတြင္ ေပၚမည္ျဖစ္သည္။
  • ၿပီးပါၿပီ။

နမူနာ
/* Label Cloud Styles
----------------------------------------------- */
#labelCloud {text-align:center;font-family:arial,sans-serif;}
#labelCloud .label-cloud li{display:inline;background-image:none !important;padding:0 5px;margin:0;vertical-align:baseline !important;border:0 !important;}
#labelCloud ul{list-style-type:none;margin:0 auto;padding:0;}
#labelCloud a img{border:0;display:inline;margin:0 0 0 3px;padding:0}
#labelCloud a{text-decoration:none}
#labelCloud a:hover{text-decoration:underline}
#labelCloud li a{}
#labelCloud .label-cloud {}
#labelCloud .label-count {padding-left:0.2em;font-size:9px;color:#000}
#labelCloud .label-cloud li:before{content:"" !important}

]]>
</b:skin>
<script type='text/javascript'>
// Label Cloud User Variables
var cloudMin = 1;
var maxFontSize = 20;
var maxColor = [0,0,255];
var minFontSize = 10;
var minColor = [0,0,0];
var lcShowCount = false;
</script>
ဆက္ဖတ္ရန္

Blog Postတြင္ Smiley Icon ထည့္ရေအာင္

ဒီတစ္လမွာ ဘာၿဂိဳလ္ေပါက္လဲမသိဘူး။ ထင္တာေတာ့ Bloggingၿဂိဳလ္ပဲျဖစ္မယ္။ ေမႊေႏွာက္လိုက္ျပန္ၿပီ Blogging။ ဒီ Postက သိပ္ေတာ့ အေရးမၾကီးေပမယ့္။ ဗဟုသုတသစ္ရပါတယ္။ Blog Postထဲမွာ Smiley Icon ထည့္လိုေသာ Bloggerမ်ားအတြက္ ျဖစ္ပါတယ္။ ေပ်ာ္စရာေကာင္းပါတယ္။ ထည့္မယ္ေနာ္.....

အဆင့္ (၁) :z
  • Blogger > Layout > Edit HTML > Expand Widgetကို အမွန္ျခစ္ျပဖို႔ မေမ့ပါႏွင့္။
  • ဤCodeကိုရွာပါ။ ]]></b:skin>
  • အထက္ပါ ရွာထားေသာ Codeေအာက္တြင္ ေအာက္ေဖာ္ျပပါ Codeကို Pasteလုပ္လိုက္ပါ။

    <script src='http://scrapur.com/index/wp-content/uploads/2008/02/smile.js'

    type='text/javascript'/>

  • Save Template bottonကိုႏွိပ္ပါ။

အဆင့္ (၂)
  • Postအသစ္ကို ေခၚပါ။
  • Smiley ထည့္လိုေသာ ေနရာတြင္ ေအာက္ပါ Codeကို ရိုက္ထည့္ရံုျဖင့္ Smileyပံုမ်ား ေပၚေစမည္ျဖစ္သည္။
:p –>:D –> :$ –> ;) –> :@ –> :# –> :k –> :x –> :o –> :O –> :L –> :r –> :s –> :y –> :~ –> :v –> :f –> :d –> :c –> :z –>


ဆက္ဖတ္ရန္
Blog Widget by LinkWithin
 

Popular Posts

Widget by Blogger Buster

Sign In and Check Message

ယေန႔ဖတ္သြားေသာ ေခါင္းစဥ္မ်ား

Recent Posts