August 9, 2009

မိမိ Blog၏ Blockquoteကို ေျပာင္းလိုက

Blockquoteဆိုတာကို သိပါသလား? ၀တၳဳစာအုပ္မွာ မ်ားေသာအားျဖင့္ လူေတြစကားေျပားတဲ့အခါ စကားေျပာတဲ့စာသားကို "Quotation Mark"နဲ႔ အဖြင့္ အပိတ္လုုပ္ထားပါတယ္။ Bloggerမွာလည္း ထည့္ထားၿပီးသားပါ။ ဒါေပမယ့္ သံုးတဲ့ Bloggerရွိသလို မသံုးတဲ့ Bloggerေတြလည္းရွိတယ္။ တခ်ိဳ႔ အေၾကာင္းအရာနဲ႔ မသက္ဆိုင္လို႔ မသံုးျဖစ္တာပါ။ Blockquoteဟာ HTMLမွ Tag တစ္ခုျဖစ္ပါတယ္။ HTMLအေၾကာင္း သိတဲ့ Webmasterသမားမ်ားကေတာ့ ဒါကို သိထားၿပီးသားပါ။ Bloggerမွာ ေပးထားတဲ့ Blockquoteက ရိုးရွင္းလြန္းပါတယ္။ ဒီထက္ပိုလွတဲ့ Blockquoteကို ယခုတင္ျပသြားမွာပါ။ မခက္ပါဘူး။

ဦးစြာ
  • ေအာက္ပါ Code ကိုရွာပါ။

    .post blockquote {


    .post blockquote {

    .....

    .....

    .....


    }


    .post blockquote {

    margin: 5px;

    padding: 0px 20px 0 15px;

    border-left: 4px solid #DDD;

    color:#777;


    }


  • ယင္း Code၏ { ......} အၾကားတြင္ ေအာက္ပါ styleမ်ား၏ Codeမ်ားကို ထည့္သြင္းပါ။

  • Style 1

    အထက္ပါ style 1အတြက္ ေအာက္ပါ codeကို သံုးပါ။


    blockquote {

    font: 14px normal helvetica, sans-serif;

    margin-top: 10px;

    margin-bottom: 10px;

    margin-left: 50px;

    padding-left: 15px;

    border-left: 3px solid #ccc;

    }
    ..................................................................................................................................

    Style 2


    အထက္ပါ Style 2အတြက္ ေအာက္ပါ Codeကို သံုးပါ။


    blockquote {

    font: 14px/20px italic Times, serif;

    padding: 8px;

    background-color: #faebbc;

    border-top: 1px solid #e1cc89;

    border-bottom: 1px solid #e1cc89;

    margin: 5px;

    background-image: url(http://i41.tinypic.com/3162czl.jpg);

    background-position: top left;

    background-repeat: no-repeat;

    text-indent: 23px;

    }

    blockquote span {

    display: block;

    background-image: url(http://i41.tinypic.com/3162czl.jpg);

    background-repeat: no-repeat;

    background-position: bottom right;

    }


    --------------------------------------------------------------------------

    ထည့္ၿပီးပါက Save Templateလုပ္ပါ။ ဒါဆိုရင္ Installation ၿပီးပါၿပီ။

    ကၽြန္ေတာ့္ Blogquote၏ပံုစံ

    Blockquoteဆိုတာကို သိပါသလား? ၀တၳဳစာအုပ္မွာ မ်ားေသာအားျဖင့္ လူေတြစကားေျပားတဲ့အခါ စကားေျပာတဲ့စာသားကို "Quotation Mark"နဲ႔ အဖြင့္ အပိတ္လုုပ္ထားပါတယ္။ Bloggerမွာလည္း ထည့္ထားၿပီးသားပါ။ ဒါေပမယ့္ သံုးတဲ့ Bloggerရွိသလို မသံုးတဲ့ Bloggerေတြလည္းရွိတယ္။ တခ်ိဳ႔ အေၾကာင္းအရာနဲ႔ မသက္ဆိုင္လို႔ မသံုးျဖစ္တာပါ။ Blockquoteဟာ HTMLမွ Tag တစ္ခုျဖစ္ပါတယ္။ HTMLအေၾကာင္း သိတဲ့ Webmasterသမားမ်ားကေတာ့ ဒါကို သိထားၿပီးသားပါ။ Bloggerမွာ ေပးထားတဲ့ Blockquoteက ရိုးရွင္းလြန္းပါတယ္။ ဒီထက္ပိုလွတဲ့ Blockquoteကို ယခုတင္ျပသြားမွာပါ။ မခက္ပါဘူး။

    မရွင္းတာရွိခဲ့ရင္ Commentေပးသြားပါ။
    ဆက္ဖတ္ရန္

    August 8, 2009

    DDOS Attacks Crush Twitter, Hobble Facebook

    ေရးသားသူ။ Michael Arrington on August 6, 2009

    ယေန႔မနက္ Twitter ကို DDOS က တြားသြားရတဲ့အထိ တိုက္ခိုက္လိုက္ၿပီး နာရီေပါင္းမ်ားစြာ ဖြင့္လို႔မရတဲ့ ျပသနာ ျဖစ္ေပၚခဲ့ပါတယ္။ Rival Facebookလည္းပဲ ထိုနည္းတူ တိုက္ခိုက္ခံခဲ့ရပါတယ္။ သို႔ေသာ္ တခ်ိဳ႔ေသာ စီမံခန္႔ခြဲေရးအပိုင္းတြင္ တခ်ိဳ႔ေသာ Usersမ်ား ၀င္ေရာက္ႏိုင္ခဲ့ပါတယ္။ တခ်ိဳ႔ေသာ Usersမ်ားကေတာ့ ယင္း Siteကို ဖြင့္လို႔မရပဲ Postမ်ားကုိလည္ ဖတ္လို႔မရခဲ့ပါ။ သို႔ေသာ္ Usersမ်ားစြာ ၀င္ေရာက္ႏိုင္ခဲ့ပါတယ္။
    Facebook၏ ထုတ္ျပန္ခ်က္
    ယကေန႔ မနက္ေစာေစာအခ်ိန္တြင္ Facebookသည္ Networkနဲ႔ ပတ္သတ္တဲ့ ေႏွာင့္ယွက္မွဳကို ခံခဲ့ရၿပီး အခ်ိဳ႔ Usersမ်ားကို Facebookအား အထင္ေသးေစေအာင္ အသေရဖ်က္ခဲ့ပါသည္။ မည္သည့္ Usersမ်ား၏ အခ်က္အလက္မ်ား အႏၱရာယ္မက်ေရာက္ပါ။ Usersမ်ား၏ အခ်က္အလက္မ်ားကို အျပည့္အ၀ ျပန္လည္ရရွိႏိုင္ရန္ ကၽြႏ္ုပ္တို႔ ၀န္ထမ္းမ်ားမွ အေရးေပၚ ျပန္လည္ စီမံႏိုင္ခဲ့ပါသည္။ Facebook ၀န္ေဆာင္မွဳ ေကာင္းမြန္ေစရန္၊ အသံုးျပဳသူမ်ား လွ်င္ျမန္စြာႏွင့္ ယံုၾကည့္စိတ္ခ်စြာ ျပန္လည္အသံုးျပဳႏိုင္ေစရန္ လက္ရွိအေျခအေနကို ဆက္လက္၍ ဦးစီးေဆာင္ရြက္ေနပါသည္။

    ကၽြန္ေတာ္တို႔ ၾကားသိရသေလာက္ေတာ့ Facebookႏွင့္ Twitterတို႔သည္ ယင္းတိုက္ခိုက္မွဳမွ ျပန္လည္ စုစည္းႏိုင္ေစရန္ အသက္ ၁၅ႏွစ္ အသံုးျပဳသူမ်ား တာ၀န္ရွိေၾကာင္း တိတိက်က် ျပသနာကို ရွာေဖြ၍ အတူတကြ အလုပ္လုပ္ေနပါသည္။
    ဆက္ဖတ္ရန္

    August 4, 2009

    Stars rating ကို Blog Postတင္တိုင္း ေပၚေစလိုက


    Postတင္တိုင္း ထိုPostအား စာဖတ္သူအေနနဲ႔ အေၾကာင္းအရာေပၚ မူတည္ၿပီး Commentေတြ ေပးၾကတယ္။ (သို႔မဟုတ္)Stars Ratingေတြ ေပးၾကတယ္။ ကၽြန္ေတာ္ ေဖာ္ျပခ်င္တာကေတာ့ Star Ratingျဖစ္ပါတယ္။ ဒါက Commentလို မဟုတ္ဘဲ လြယ္လြယ္ကူကူနဲ႔ ေပးႏိုင္ပါတယ္။ ၾကယ္ေလးေတြကို ေရြးခ်ယ္ၿပီး Voteလုပ္ရံုပါပဲ။ ကၽြန္ေတာ့္ရဲ့ Postေတြကိုလည္း Vote လုပ္သြားပါဦး။ ပံုမွန္အားျဖင့္ Bloggerမွ ေပးထားတဲ့ Templateေတြကို သံုးရင္ Star Rating ပါထားၿပီးသား ျဖစ္ပါတယ္။ သင္သည္ Bloggerမွ ေပးထားေသာ Templateကို ယူသံုးထားပါက ေအာက္ပါအဆင့္အတိုင္းသြားပါ။

    ၁။ Blogger Sign In > Dashboard > Layout > Page Elements ကိုသြားပါ။
    ၂။ Page Elementsမ်ားတြင္ Blog Posts၏ ေအာက္တြင္ Editကို ႏွိပ္ပါ။
    ၃။ ထိုေနာက္ Stars Ratingကို အမွန္ျခစ္ျပၿပီး Saveလုပ္လိုက္ပါ။

    အကယ္၍ သင္သည္ တျခား Custom Templateကို သံုးပါက။ အထက္ပါ အတိုင္း Blog Postsတြင္ Stars Rating ေပၚလာမည္ မဟုတ္ပါ။ ထို႔ေၾကာင့္ ဤ Postတြင္ တင္ျပရျခင္း ျဖစ္ပါတယ္။ တခ်ိဳ႔ Bloggerေတြက ဒါကို ထည့္ရမွန္း မသိေသးသူမ်ား ရွိပါတယ္။ ဒါေၾကာင့္ လိုအပ္ပါက ထည့္ႏိုင္ပါတယ္။

    သင္၏ Blogတြင္ Stars Ratingမရွိေသးပါက ေအာက္ပါတိုင္း ထည့္သြင္းႏိုင္ပါသည္။

    ၁။ ဦးစြာ www.outbrain.com siteကို သြားပါ။ တိုင္ရိုက္သြားလိုက ဤလင့္ကို ႏွိပ္ပါ။

    ၂။ မိမိ၏ Platformကို ေရြးပါ။ အထူးသျဖင့္ Bloggerကို ေရြးေပါ့။ ေအာက္ပါပံုအတိုင္း ျမင္ရမည္ျဖစ္သည္။

    ၃။ Get rating & recommendations widget for Blogger ဟူ၍ ေပၚလာမည္ျဖစ္သည္။ Step ၂ဆင့္ ရွိသည္။ ပထမအဆင့္သည္ Step 1: Register (Optional) မွတ္ပံုတင္ရမည္ျဖစ္သည္။ မွတ္ပံုတင္ရန္ I want to registerကို အမွန္ျခစ္ျပပါ။ Formျဖည့္ရမည္ျဖစ္သည္။
    - Username:
    - Password:
    - Confirm Password:
    - email:
    - Blog URL:

    မ်ားကိုထည့္သြင္းပါ။ By registering, I agree the Outbrain TOS and Privacy Policyကို အမွန္ျခစ္ျပပါ။
    ထို႔ေနာက္ Register buttonကိုႏွိပ္လိုက္ပါ။

    ၄။ Submittingလုပ္မည္ျဖစ္သည္။ ခဏေစာင့္ရမည္ျဖစ္သည္။ ၿပီးက မိမိ Emailသို႔ Messageတစ္ေစာင္ ပို႔မည္ျဖစ္သည္။ Email checkလုပ္ပါ။ ထို Messageထဲတြင္ Linkတစ္ခုကို ႏွိပ္ရန္ ေတာင္းဆိုလာပါမည္။ Activateလုပ္ရန္ျဖစ္သည္။ ထို Linkအား ႏွိပ္လိုက္ပါ။ Windowတစ္ခု ထြက္လာမည္ျဖစ္သည္။ ဒါဆို Activateလုပ္ၿပီးသြားပါၿပီ။

    ၅။ ထိုေနာက္ ယင္း Windowတြင္ Widgetထည့္ရန္ Bloggerကို ေရြးပါ။ ထို႔ေနာက္ Add Widgetကို ထည့္ရန္ Windowတစ္ခု ေပၚလာပါမည္။ Nameေျပာင္းႏိုင္ပါသည္။ Add widget buttonကိုႏွိပ္ပါ။ ဒါဆိုရင္ ထည့္ၿပီးပါၿပီ။

    ၆။ View Blog ေပၚ၊ မေပၚ စစ္ေဆးပါ။ ၿပီးပါၿပီ။


    မရွင္းလင္းတာ ရွိခဲ့ရင္ Commentေပးသြားပါ။
    ဆက္ဖတ္ရန္

    July 31, 2009

    Email Me Formထည့္သင့္ေၾကာင္း

    Email Formကို Blogထဲတြင္ ထည့္သင့္ပါသည္။ ဘာေၾကာင့္ထည့္သင့္ပါသလဲ?။ ထည့္သင့္တာေပါ့။ မိမိ Blogထဲသို႔ေရာက္လာေသာ စာဖတ္သူေတြက အေၾကာင္းတစ္စံုတစ္ရာကို သိခ်င္တယ္။ အၾကံေပးလိုတယ္။ Messageပို႔ခ်င္တယ္။ ေမးျမန္းလိုတယ္။ အၾကံေတာင္းလိုတယ္။ ဒါကို အခ်ိန္အတိုတြင္းမွာ Emailပို႔သလို တိုက္ရိုက္ပို႔ႏိုင္ပါတယ္။ ပို႔ဖို႔ Message serverထဲ၀င္စရာမလိုပါဘူး။ မိမိ Blogမွ တိုက္ရိုက္ပို႔ႏိုင္ပါတယ္။ ဒါဆို သိပ္ထည့္သင့္တာေပါ့။ ဒါဆို ဘယ္လိုထည့္မွာလဲ။

    အဆင့္ေတြက မ်ားပါတယ္။ စိတ္ရွည္စြာ ထည့္သြင္းရပါမယ္။ သရက္သီးမွည့္စားခ်င္ရင္ မွည့္တဲ့အထိ ေစာင့္ရမွာေပါ့။ မေလာနဲ႔ေနာ္.. ။ အမွားလုပ္မိမယ္။ မလိမ္မာရင္ သံုးခါေမာမယ္။ ပံုစံကို ၾကည့္ခ်င္ရင္ေတာ့ ဒီမွာ ၾကည့္ပါ။

    ဦးစြာ..
    ၁။ ဤ Websiteထဲကို၀င္ပါ။
    ၂။ ၄င္း Pageမွ Signup for Free linkကိုႏွိပ္ပါ။
    ၃။ Sign Up လုပ္ၿပီးပါက မိမိ၏ Emailထဲသို႔ Link တစ္ခုပို႔ပါမည္။ Activateလုပ္ရန္ Linkပို႔ျခင္းျဖစ္သည္။
    ၄။ မိမိ၏ Emailထဲသို႔၀င္ပါ။ ဥပမာ - Gmail။ ၀င္ၿပီးပါက Emailmeform websiteမွ ပို႔လာေသာ Messageကို ေတြ႔ရမည္ျဖစ္သည္။ ထို Linkအားႏွိပ္ပါ။ ဒါဆို Activateလုပ္ၿပီးပါၿပီ။
    ၅။ Helloဆိုၿပီ သင့္အား ႀကိဳဆိုပါမည္။ Nagivation Barေအာက္တြင္ Create New Form Linkကိုႏွိပ္ပါ။
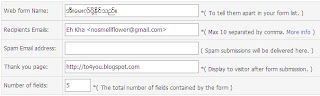
    ၆။ Web Form Wizard - Step 1တြင္
    - Web Form Nameေပးပါ။ ျမန္မာလိုေပးႏိုင္သည္။
    - Recipients Emails: တြင္ သင္၏ Emailလိပ္စာကိုျပမည္။ ျပင္စရာမလိုပါ။
    - Spam Email address: ထည့္စရာ မလိုပါ။
    - Thank you page: သည့္ တစ္ေယာက္ေယာက္က Messageပို႔ၿပီးက ေပၚလာမည့္ သင္၏ Blogစာမ်က္ႏွာျဖစ္သည္။ မိမိ၏ Blog URLအား ထည့္ပါ။ ဥပမာ - http://to4you.blogspot.com
    - Number of fields:သည့္ မိမိထည့္လိုေသာ Fieldျဖစ္သည္။ ကၽြန္ေတာ့္ Blogတြင္ Field ၅ခု ထည့္ထားပါသည္။
    ၿပီးက Next buttonကို ႏွိပ္ပါ။

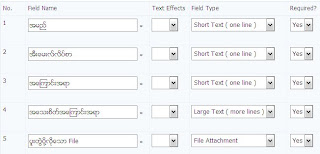
    ၇။ မိမိ၏ Field Nameကို ထည့္သြင္းရမည္ျဖစ္သည္။
    - ကၽြန္ေတာ္၏ Blogတြင္ (အမည္၊ အီးေမးလ္လိပ္စာ၊ အေၾကာင္းအရာ၊ အေသးစိတ္အေၾကာင္းအရာ၊ ပူးတြဲပို႔လိုေသာ File ဟူ၍ ျမန္မာလို ထည့္သြင္းထားပါသည္။ Text
    - Text Effectထည့္ႏိုင္သည္။
    - Field Typeတြင္ အေသးစိတ္အေၾကာင္းအရာ Fieldအား Large Text (More Lines) ထည့္ရမည္။ အဘယ္ေၾကာင့္ဆိုေသာ အေသးစိတ္ Messageကို ထည့္ရျခင္းေၾကာင့္ျဖစ္သည္။ ပူးတြဲပို႔လိုေသာ Fileတြင္ (File Attachment) ေရြးရမည္ျဖစ္သည္။ အဘယ္ေၾကာင့္ဆိုေသာ ပူးတြဲ Fileထည့္ရန္ျဖစ္သည္။ Required? တြင္ Yes အခုတိုင္း ေရြးရမည္ျဖစ္သည္။ Next buttonကိုႏွိပ္ပါ။
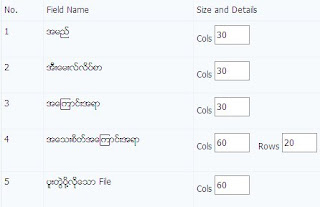
    ၈။ Step 3 တြင္ No., Field Name and Size and Details ရွိပါသည္။ သင္ျပင္ရမ်ာ က Size and Detailsသာ ျဖစ္သည္။ အဘယ္ေၾကာင့္ဆိုေသာ္ မိမိ၏ Post Areaေပၚမူတည္ၿပီး Sizeကို ျပင္ရမည္ျဖစ္သည္။ ကၽြန္ေတာ့္၏ Formရွိ အေသးစိတ္အေၾကာင္းအရာတြင္ clos= 60ႏွင့္ Rows=20 ထားထားပါသည္။ ပူးတြဲပို႔လိုေသာ Fileတြင္ ၅၀ထားပါသည္။ ျပင္ၿပီးက Nextကိုႏွိပ္ပါ။


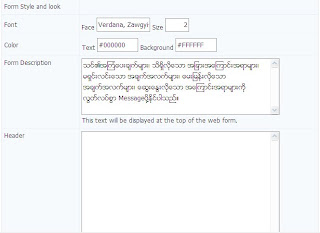
    ၉။ Step 4တြင္
    - Font Face၌ Verdana, Zawgyi-oneထည့္ေပးပါ။
    - Size=2,
    - Textႏွင့္ Backgroundတြင္ အေရာင္ေျပာင္းႏိုင္သည္။ HTML color codeကိုထည့္ႏိုင္သည္။
    - Form Descriptionသည့္ မိမိ Form၏ အေပၚတြင္ ေပၚမည့္စာသားျဖစ္သည္။ ထည့္သင့္ပါသည္။ ကၽြန္ေတာ့္ Blog၏ ဆက္သြယ္ရန္ ေနရာတြင္ ၾကည့္ပါ။

    - ေလာေလာဆယ္ မလိုအပ္ေသးသည့္ အရာမ်ား မထည့္ထားပါ။
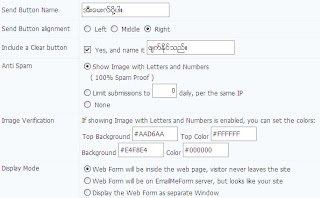
    - Send Button Nameကို ျမန္မာလိုေရးႏိုင္သည္။ ကၽြန္ေတာ္က "အီးေမးလ္ပို႔ပါ။"ဟုေရးထားပါသည္။ Alignmenကို Rightလုပ္ထားပါသည္။ မိမိထားလိုေသာေနရာတြင္ ထားပါရန္။
    - Include Clear button- ဖ်က္ႏိုင္သည္ဆိုသည့္ Buttonေလး ထည့္လိုပါက။ ကၽြန္ေတာ္ထည့္ထားပါသည္။
    - Anti-Spam တြင္ Show Image with letters and numberမ်ားကို ျပရပါမည္။
    - Display Modeသံုးခုရွိသည့္အနက္ Web Form will be inside the web page, visitors never leave the siteကို ေရြးခ်ယ္ရန္ အသင့္ေတာ္ဆံုးျဖစ္သည္။ ထိုမွသာလွ်င္ ဧည့္သည္ေတာ္မ်ား အထြက္သြားႏိုင္ပါ။
    - ၿပီးက Next ကိုႏွိပ္ပါ။
    ၁၀။ Step 5တြင္ Send copy of senderႏွင့္ Include data for exportကို Yes ျပထားသင့္သည္။ Nextကိုႏွိပ္ပါ။
    ၁၁။ Step 6သည့္ Formေပၚမည့္ပံုစံျဖစ္သည္။ ပံုစံမႀကိဳက္ေသးပါက Backလုပ္၍ ျပင္ႏိုင္ပါသည္။ ထို႔ေနာက္ Finish buttonကိုႏွိပ္ပါ။
    ၁၂။ You form has been saved သိမ္းၿပီးေၾကာင္း. ထိုေနရာတြင္ Get the HTML codeကိုႏွိပ္ပါ။
    ၁၃။ Copy and Paste the HTML codeတြင္ ထို Codeအား ကူးယူၿပီး
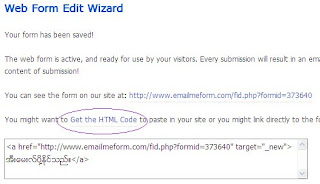

    ဆက္သြယ္ရန္ဆိုသည့္ Postအတြက္ New Postကို ေခၚၿပီး HTML viewျဖင့္ႏွိပ္ကာ ထို Codeအား Pasteလုပ္လိုက္ပါ။ ေခါင္းစဥ္အား ဆက္သြယ္ရန္ ရိုက္ထည့္ပါ။ ၾကိဳက္သလို ထည့္ႏိုင္သည္။

    ၁၄။ Publish Postႏွိပ္ပါ။ လုပ္ေဆာင္ခ်က္ ၿပီးပါၿပီ။
    မိမိျပဳလုပ္ၿပီးေသာ Formအား www.emailmeform.comတြင္ ျပန္ျပင္ႏိုင္ပါသည္။ Formမ်ားစြာကိုလည္း ဖန္တီးႏိုင္ပါသည္။
    အဆင္ကေတာ့ မ်ားပါတယ္။ စိတ္ရွည္စြ
    ဆက္ဖတ္ရန္

    July 28, 2009

    Flash Animated Labels Tag Cloudထည့္ရေအာင္

    Blogတိုင္းတြင္ ပံုမွန္အားျဖင့္ Side Bar၌ Labels widgetမ်ားပါပါသည္။ တခ်ိဳ႔ေသာ Bloggerမ်ားသည္ ထိုပံုစံကို မႏွစ္သက္ၾကပါသည္။ ထို႔ေၾကာင့္ မိမိတို႔ႏွစ္သက္ေသာ ပံုစံမ်ားကို ရွာေဖြေလ့ရွိပါသည္။ ယခုတင္ျပမည့္ အေၾကာင္းအရာကေတာ့ Flash Animated Label Tags Cloudျဖစ္ပါတယ္။ ႏွစ္သက္မယ္လို႔ ယံုၾကည္ပါတယ္။ မိမိတို႔၏ ဧည့္သည္မ်ားသည္လည္း ပံုစံသစ္ Labelကို ႏွစ္သက္ၾကပါတယ္။ ဒါေၾကာင့္ Styleသစ္ တင္ရန္ လိုပါသည္။ ကၽြန္ေတာ့္ရဲ့ Blogမွာလည္း တင္ထားပါတယ္။ Page နဲ႔လိုက္ေအာင္လည္း အေရာင္ျပင္ထားပါတယ္။
    ကိုင္း ဒါကို ဘယ္လိုထည့္မွာလဲ?

    ၁။ Blog Sign In> Dashboard> Layout> Edit HTMLကိုႏွိပ္ပါ။ Expend Widgetကို အမွန္ျခစ္ျပဖို႔ မေမ့ပါနဲ႔။
    ၂။ ေအာက္ပါ Codeကိုရွာပါ။


    <b:section class='sidebar' id='sidebar' preferred='yes'>


    ၃။ ရွာထားေသာ အေပၚCode၏ေအာက္တြင္ ေအာက္ပါ codeကို ထည့္သြင္းလိုက္ပါ။

    ဤ Codeကို Google Docထဲတြင္ထည့္ထားပါသည္။ ယူပါရန္။

    ၄။ Save Templateလုပ္ပါ။

    မွတ္ခ်က္။ ။ Page Elementတြင္ Label ဆိုသည့္ gedgetကို ေတြ႔ရပါလိမ့္မည္။ မိမိထားလိုသည့္ ေနရာတြင္ ေျပာင္းလိုက္ပါ။ width="250" height="200" ကိုလည္းေျပာင္းႏိုင္ပါသည္။
    ဆက္ဖတ္ရန္

    Adding Falling Hearts in Bloggerထည့္ရေအာင္

    အရင္တစ္ေခါက္ကတင္တဲ့ Adding Falling Starsအတိုင္း ေပါ့ပါးတဲ့ Falling Objectsေတြကို ထပ္တင္လိုက္ပါတယ္။ ႀကိဳက္တယ္ဆိုရင္ ထည့္လိုက္ေပါ့။

    နမူနာပံုစံကို ဤ Blogမွာ ၾကည့္ႏိုင္ပါတယ္။

    ၁။ Blogger Sign In> Layout > Page Elements > Add a gadget >HTML/JavaScriptေခၚပါ။
    ၂။ ေအာက္ပါ Codeကို ကူးယူ၍ Pasteလုပ္ပါ။


    <marquee behavior="scroll" direction="down" style="position:absolute; left:110px; top:150px; width:16px; height:483px; z-index:1;" scrollamount="3"><span class="falling1"><img src="http://www.allblogtools.com/imgup/12-2008/uploaded/heart3.gif"/></span></marquee>

    <marquee behavior="scroll" direction="down" style="position:absolute; left:169px; top:170px; width:16px; height:411px; z-index:1;" scrollamount="2"><span class="falling2"><img src="http://www.allblogtools.com/imgup/12-2008/uploaded/heart3.gif"/></span></marquee>

    <marquee behavior="scroll" direction="down" style="position:absolute; left:213px; top:190px; width:16px; height:346px; z-index:1;" scrollamount="3"><span class="falling1"><img src="http://www.allblogtools.com/imgup/12-2008/uploaded/heart3.gif"/></span></marquee>

    <marquee behavior="scroll" direction="down" style="position:absolute; left:279px; top:180px; width:16px; height:512px; z-index:1;" scrollamount="1"><span class="falling2"><img src="http://www.allblogtools.com/imgup/12-2008/uploaded/heart3.gif"/></span></marquee>

    <marquee behavior="scroll" direction="down" style="position:absolute; left:310px; top:160px; width:16px; height:428px; z-index:1;" scrollamount="7"><span class="falling1"><img src="http://www.allblogtools.com/imgup/12-2008/uploaded/heart3.gif"/></span></marquee>

    <marquee behavior="scroll" direction="down" style="position:absolute; left:250px; top:190px; width:16px; height:206px; z-index:1;" scrollamount="5"><span class="falling2"><img src="http://www.allblogtools.com/imgup/12-2008/uploaded/heart3.gif"/></span></marquee>

    <marquee behavior="scroll" direction="down" style="position:absolute; left:148px; top:150px; width:16px; height:287px; z-index:1;" scrollamount="7"><span class="falling1"><img src="http://www.allblogtools.com/imgup/12-2008/uploaded/heart3.gif"/></span></marquee>

    <marquee behavior="scroll" direction="down" style="position:absolute; left:297px; top:170px; width:16px; height:239px; z-index:1;" scrollamount="6"><span class="falling2"><img src="http://www.allblogtools.com/imgup/12-2008/uploaded/heart3.gif"/></span></marquee>

    <marquee behavior="scroll" direction="down" style="position:absolute; left:110px; top:230px; width:16px; height:254px; z-index:1;" scrollamount="7"><span class="falling1"><img src="http://www.allblogtools.com/imgup/12-2008/uploaded/heart3.gif"/></span></marquee>

    <marquee behavior="scroll" direction="down" style="position:absolute; left:369px; top:190px; width:16px; height:420px; z-index:1;" scrollamount="3"><span class="falling2"><img src="http://www.allblogtools.com/imgup/12-2008/uploaded/heart3.gif"/></span></marquee>

    <marquee behavior="scroll" direction="down" style="position:absolute; left:385px; top:150px; width:16px; height:520px; z-index:1;" scrollamount="3"><span class="falling1"><img src="http://www.allblogtools.com/imgup/12-2008/uploaded/heart3.gif"/></span></marquee>

    <marquee behavior="scroll" direction="down" style="position:absolute; left:441px; top:170px; width:16px; height:381px; z-index:1;" scrollamount="4"><span class="falling2"><img src="http://www.allblogtools.com/imgup/12-2008/uploaded/heart3.gif"/></span></marquee>

    <marquee behavior="scroll" direction="down" style="position:absolute; left:477px; top:200px; width:16px; height:392px; z-index:1;" scrollamount="7"><span class="falling1"><img src="http://www.allblogtools.com/imgup/12-2008/uploaded/heart3.gif"/></span></marquee>

    <marquee behavior="scroll" direction="down" style="position:absolute; left:569px; top:170px; width:16px; height:485px; z-index:1;" scrollamount="6"><span class="falling2"><img src="http://www.allblogtools.com/imgup/12-2008/uploaded/heart3.gif"/></span></marquee>

    <marquee behavior="scroll" direction="down" style="position:absolute; left:599px; top:200px; width:16px; height:386px; z-index:1;" scrollamount="3"><span class="falling1"><img src="http://www.allblogtools.com/imgup/12-2008/uploaded/heart3.gif"/></span></marquee>

    <marquee behavior="scroll" direction="down" style="position:absolute; left:530px; top:170px; width:16px; height:383px; z-index:1;" scrollamount="1"><span class="falling2"><img src="http://www.allblogtools.com/imgup/12-2008/uploaded/heart3.gif"/></span></marquee>

    <marquee behavior="scroll" direction="down" style="position:absolute; left:608px; top:200px; width:16px; height:347px; z-index:1;" scrollamount="1"><span class="falling1"><img src="http://www.allblogtools.com/imgup/12-2008/uploaded/heart3.gif"/></span></marquee>

    <marquee behavior="scroll" direction="down" style="position:absolute; left:642px; top:250px; width:16px; height:435px; z-index:1;" scrollamount="7"><span class="falling2"><img src="http://www.allblogtools.com/imgup/12-2008/uploaded/heart3.gif"/></span></marquee>

    <marquee behavior="scroll" direction="down" style="position:absolute; left:681px; top:290px; width:16px; height:499px; z-index:1;" scrollamount="3"><span class="falling1"><img src="http://www.allblogtools.com/imgup/12-2008/uploaded/heart3.gif"/></span></marquee>

    <marquee behavior="scroll" direction="down" style="position:absolute; left:659px; top:180px; width:16px; height:222px; z-index:1;" scrollamount="7"><span class="falling2"><img src="http://www.allblogtools.com/imgup/12-2008/uploaded/heart3.gif"/></span></marquee>

    <marquee behavior="scroll" direction="down" style="position:absolute; left:698px; top:160px; width:16px; height:250px; z-index:1;" scrollamount="4"><span class="falling1"><img src="http://www.allblogtools.com/imgup/12-2008/uploaded/heart3.gif"/></span></marquee>

    <marquee behavior="scroll" direction="down" style="position:absolute; left:726px; top:200px; width:16px; height:382px; z-index:1;" scrollamount="1"><span class="falling2"><img src="http://www.allblogtools.com/imgup/12-2008/uploaded/heart3.gif"/></span></marquee>

    <marquee behavior="scroll" direction="down" style="position:absolute; left:754px; top:150px; width:16px; height:542px; z-index:1;" scrollamount="1"><span class="falling1"><img src="http://www.allblogtools.com/imgup/12-2008/uploaded/heart3.gif"/></span></marquee>

    <marquee behavior="scroll" direction="down" style="position:absolute; left:780px; top:180px; width:16px; height:437px; z-index:1;" scrollamount="2"><span class="falling2"><img src="http://www.allblogtools.com/imgup/12-2008/uploaded/heart3.gif"/></span></marquee>


    <a style="color: #000080; font-family: tahoma; font-size: 11px; text-decoration: none; border: 1px double #00ADEF; padding: 1px; background: #FFF" target="_blank" href="http://www.allblogtools.com/">

    Get Blogger Falling Hearts</a>


    ၃။ Save လုပ္ပါ။ ထို Gedgetကို Sidebarေအာက္ေျခတြင္ထားပါ။
    ၄။ Save ထပ္လုပ္ပါ။
    ဆက္ဖတ္ရန္

    Adding Falling Star For Blogger

    လာျပန္ၿပီ Blogging. ေတာင္းဆိုခ်က္ေတြမ်ားတယ္။ အရင္တစ္ေခါက္ကတင္တဲ့ Snow Effectsက Blog Pageကို ေလးေစတယ္တဲ့။ ဒါ့ေၾကာင့္ ဒီထက္ သြက္လပ္ၿပီး ေပါ့ပါးတဲ့ Falling Objectsေတြ ထပ္လိုခ်င္တယ္တဲ့။ ဒါေၾကာင့္ ဒီ Postကို ထပ္တင္လိုက္ပါတယ္။

    Animated
    ၾကည္ေလးေတြ Blog Pageေပၚမွာ ဖြင့္လိုက္တိုင္း အလိုလိုနဲ႔ က်လာေအာင္ ထည့္လိုက္ၾကစို႔။ ပံုစံကို ဤ Blogမွာ ၾကည့္ႏိုင္ပါတယ္။

    ၁။ Blogger Sign In> Layout > Page Elements > Add a gadget >HTML/JavaScriptေခၚပါ။
    ၂။ ေအာက္ပါ Codeကို ကူးယူ၍ Pasteလုပ္ပါ။


    <a style="color: #000080; font-family: tahoma; font-size: 11px; text-decoration: none; border: 1px double #00ADEF; padding: 1px; background: #FFF" target="_blank" href="http://www.allblogtools.com/">Get Blogger Falling Objects</a>

    <div align="center">

    <marquee behavior="scroll" direction="down" style="position:absolute; left:110px; top:150px; width:16px; height:483px; z-index:1;" scrollamount="3"><span class="falling1"><img src="http://www.allblogtools.com/imgup/1-2009/uploaded/AllBlogTools.com.gif"/></span></marquee>

    <marquee behavior="scroll" direction="down" style="position:absolute; left:169px; top:170px; width:16px; height:411px; z-index:1;" scrollamount="2"><span class="falling2"><img src="http://www.allblogtools.com/imgup/1-2009/uploaded/AllBlogTools.com.gif"/></span></marquee>

    <marquee behavior="scroll" direction="down" style="position:absolute; left:213px; top:190px; width:16px; height:346px; z-index:1;" scrollamount="3"><span class="falling1"><img src="http://www.allblogtools.com/imgup/1-2009/uploaded/AllBlogTools.com.gif"/></span></marquee>

    <marquee behavior="scroll" direction="down" style="position:absolute; left:279px; top:180px; width:16px; height:512px; z-index:1;" scrollamount="1"><span class="falling2"><img src="http://www.allblogtools.com/imgup/1-2009/uploaded/AllBlogTools.com.gif"/></span></marquee>

    <marquee behavior="scroll" direction="down" style="position:absolute; left:310px; top:160px; width:16px; height:428px; z-index:1;" scrollamount="7"><span class="falling1"><img src="http://www.allblogtools.com/imgup/1-2009/uploaded/AllBlogTools.com.gif"/></span></marquee>

    <marquee behavior="scroll" direction="down" style="position:absolute; left:250px; top:190px; width:16px; height:206px; z-index:1;" scrollamount="5"><span class="falling2"><img src="http://www.allblogtools.com/imgup/1-2009/uploaded/AllBlogTools.com.gif"/></span></marquee>

    <marquee behavior="scroll" direction="down" style="position:absolute; left:148px; top:150px; width:16px; height:287px; z-index:1;" scrollamount="7"><span class="falling1"><img src="http://www.allblogtools.com/imgup/1-2009/uploaded/AllBlogTools.com.gif"/></span></marquee>

    <marquee behavior="scroll" direction="down" style="position:absolute; left:297px; top:170px; width:16px; height:239px; z-index:1;" scrollamount="6"><span class="falling2"><img src="http://www.allblogtools.com/imgup/1-2009/uploaded/AllBlogTools.com.gif"/></span></marquee>

    <marquee behavior="scroll" direction="down" style="position:absolute; left:110px; top:230px; width:16px; height:254px; z-index:1;" scrollamount="7"><span class="falling1"><img src="http://www.allblogtools.com/imgup/1-2009/uploaded/AllBlogTools.com.gif"/></span></marquee>

    <marquee behavior="scroll" direction="down" style="position:absolute; left:369px; top:190px; width:16px; height:420px; z-index:1;" scrollamount="3"><span class="falling2"><img src="http://www.allblogtools.com/imgup/1-2009/uploaded/AllBlogTools.com.gif"/></span></marquee>

    <marquee behavior="scroll" direction="down" style="position:absolute; left:385px; top:150px; width:16px; height:520px; z-index:1;" scrollamount="3"><span class="falling1"><img src="http://www.allblogtools.com/imgup/1-2009/uploaded/AllBlogTools.com.gif"/></span></marquee>

    <marquee behavior="scroll" direction="down" style="position:absolute; left:441px; top:170px; width:16px; height:381px; z-index:1;" scrollamount="4"><span class="falling2"><img src="http://www.allblogtools.com/imgup/1-2009/uploaded/AllBlogTools.com.gif"/></span></marquee>

    <marquee behavior="scroll" direction="down" style="position:absolute; left:477px; top:200px; width:16px; height:392px; z-index:1;" scrollamount="7"><span class="falling1"><img src="http://www.allblogtools.com/imgup/1-2009/uploaded/AllBlogTools.com.gif"/></span></marquee>

    <marquee behavior="scroll" direction="down" style="position:absolute; left:569px; top:170px; width:16px; height:485px; z-index:1;" scrollamount="6"><span class="falling2"><img src="http://www.allblogtools.com/imgup/1-2009/uploaded/AllBlogTools.com.gif"/></span></marquee>

    <marquee behavior="scroll" direction="down" style="position:absolute; left:599px; top:200px; width:16px; height:386px; z-index:1;" scrollamount="3"><span class="falling1"><img src="http://www.allblogtools.com/imgup/1-2009/uploaded/AllBlogTools.com.gif"/></span></marquee>

    <marquee behavior="scroll" direction="down" style="position:absolute; left:530px; top:170px; width:16px; height:383px; z-index:1;" scrollamount="1"><span class="falling2"><img src="http://www.allblogtools.com/imgup/1-2009/uploaded/AllBlogTools.com.gif"/></span></marquee>

    <marquee behavior="scroll" direction="down" style="position:absolute; left:608px; top:200px; width:16px; height:347px; z-index:1;" scrollamount="1"><span class="falling1"><img src="http://www.allblogtools.com/imgup/1-2009/uploaded/AllBlogTools.com.gif"/></span></marquee>

    <marquee behavior="scroll" direction="down" style="position:absolute; left:642px; top:250px; width:16px; height:435px; z-index:1;" scrollamount="7"><span class="falling2"><img src="http://www.allblogtools.com/imgup/1-2009/uploaded/AllBlogTools.com.gif"/></span></marquee>

    <marquee behavior="scroll" direction="down" style="position:absolute; left:681px; top:290px; width:16px; height:499px; z-index:1;" scrollamount="3"><span class="falling1"><img src="http://www.allblogtools.com/imgup/1-2009/uploaded/AllBlogTools.com.gif"/></span></marquee>

    <marquee behavior="scroll" direction="down" style="position:absolute; left:659px; top:180px; width:16px; height:222px; z-index:1;" scrollamount="7"><span class="falling2"><img src="http://www.allblogtools.com/imgup/1-2009/uploaded/AllBlogTools.com.gif"/></span></marquee>

    <marquee behavior="scroll" direction="down" style="position:absolute; left:698px; top:160px; width:16px; height:250px; z-index:1;" scrollamount="4"><span class="falling1"><img src="http://www.allblogtools.com/imgup/1-2009/uploaded/AllBlogTools.com.gif"/></span></marquee>

    <marquee behavior="scroll" direction="down" style="position:absolute; left:726px; top:200px; width:16px; height:382px; z-index:1;" scrollamount="1"><span class="falling2"><img src="http://www.allblogtools.com/imgup/1-2009/uploaded/AllBlogTools.com.gif"/></span></marquee>

    <marquee behavior="scroll" direction="down" style="position:absolute; left:754px; top:150px; width:16px; height:542px; z-index:1;" scrollamount="1"><span class="falling1"><img src="http://www.allblogtools.com/imgup/1-2009/uploaded/AllBlogTools.com.gif"/></span></marquee>

    <marquee behavior="scroll" direction="down" style="position:absolute; left:780px; top:180px; width:16px; height:437px; z-index:1;" scrollamount="2"><span class="falling2"><img src="http://www.allblogtools.com/imgup/1-2009/uploaded/AllBlogTools.com.gif"/></span></marquee>

    </div>


    ၃။ Save လုပ္ပါ။ ထို Gedgetကို Sidebarေအာက္ေျခတြင္ထားပါ။
    ၄။ Save ထပ္လုပ္ပါ။

    ဆက္ဖတ္ရန္

    July 27, 2009

    Blog Pageတြင္ အေပၚတက္ရန္ (သို႔) Back toTop Botton ထည့္လိုပါက

    Blog Pageတြင္ အေပၚတက္ရန္ (သို႔ ) Back toTop Bottonေလး ထည့္လိုလွ်င္ ေအာက္ပါ Codeကို ထည့္ပါ။
    <a style="display:scroll;position:fixed;bottom:5px;right:5px;" href="#" title="Back to Top"><img src="YOUR IMAGE LINK HERE" /></a>

    ထို Codeအားထည့္ရန္
    ၁။ Blogger Sign In> Layout > Page Elements > Add a gedget > HTML/ JavaScriptကို ေခၚပါ။
    ၂။ ကူးယူထားေသာ Codeအား ထည့္သြင္းလိုက္ပါ။
    ၃။ YOUR IMAGE LINK HEREေနရာတြင္ မိမိထည့္လိုေသာ Up Arrowကို ထည့္ႏိုင္ပါသည္။
    ၄။ ေအာက္ပါ Buttonမ်ားကိုလည္း ထည့္ႏိုင္ပါသည္။ ပံုကို Righ-clickႏွိပ္ၿပီး Address (URL)ကို Copyလုပ္၍ ထည့္ႏိုင္ပါသည္။ Search Engineတြင္လည္း ရွာယူႏုိင္ပါသည္။

    ဆက္ဖတ္ရန္

    July 25, 2009

    သင္၏ Blog URLအား Search Engineထဲသို႔ တင္ပို႔လိုပါသလား

    အကယ္၍ သင္သည္ မိမိ၏ Blogအတြက္ Good Trafficလိုခ်င္ပါက မိမိ၏ Blog URLအား Search Engineထဲသို႔ တင္ပို႔ပါက ေကာင္းေသာ လုပ္ေဆာင္ခ်က္သာ ျဖစ္ပါသည္။ မိမိ၏ Blog URLအား Search Engineထဲသို႔ တင္ပို႔လိုက္ျခင္းအားျဖင့္ ထို Search Engineမ်ားမွတဆင့္ မိမိ၏ Blogအား အလြယ္တကူရွာႏိုင္ပါသည္။ ေၾကျငာၿပီးသား ျဖစ္လိမ့္မည္။ လုပ္သင့္လုပ္ထိုက္ေသာ Tipတစ္ခုသာျဖစ္သည္။

    ထိုကဲ့သို႔ Submittingလုပ္လိုပါက ေအာက္ပါ Websitsမ်ားမွ Submitလုပ္ႏိုင္ပါသည္။

    ၁။ Submit Express
    ၂။ Free Web Submission
    ၃။ My Page Rant

    လုပ္ေဆာင္ခ်က္ အဆင့္ဆင့္ကို မတင္ျပေတာ့ပါ။ ယင္း Websiteမ်ား၏ အဆင့္မ်ားအတိုင္း လိုက္နာပါ။

    ဆက္ဖတ္ရန္

    Scroll Bar/ Boxျဖင့္ Bloggerတြင္ Postတင္မယ္

    Scroll Bar/ Boxသည္ မိမိ၏ Webpageအား ေနရာယူမွဳ နည္းပါးၿပီး တစ္ခ်ိန္တည္းျဖင့္ Postတစ္ခုကို Scrollလုပ္ရံုျဖင့္ အလြယ္တကူ ဖတ္ႏိုင္ပါသည္။ ဤအေၾကာင္းအရာကိုတင္ဖို႔ ေတာင္းဆိုလာေသာေၾကာင့္ တမ်ိဳးတဖံု အက်ိဳးရွိမလားဆိုၿပီး တင္ျဖစ္လိုက္ပါတယ္။ အမွန္တကယ္လည္း အသံုး၀င္ပါတယ္။

    ဒါဆို ထည့္ၾကရေအာင္..

    ၁။ Blogger ထဲသို႔ Sign In၀င္ပါ။
    ၂။ Dashboard > New Postကို ေခၚပါ။
    ၃။ ေအာက္ပါ Codeကို Post boxတြင္ သြင္းလိုက္ပါ။


    <div style="overflow:auto;width:300px;height:200px;padding:10px;border:1px solid #eee">Your Text here here!</div>


    ၄။ Your Text Hereေနရာတြင္ မိမိထည့္လိုေသာ အေၾကာင္းအရာမ်ားအား အျပည့္အစံုထည့္လိုက္ပါ။
    ၅။ Publish Postလုပ္လိုက္ပါ။ ၿပီးပါၿပီ။

    Example:

    ငါးဖယ္ဆီၿပန္ ခ်က္နည္း

    ပါ၀င္ပစၥည္းမ်ား
    - ငါးဖယ္ၿခစ္ (ထုိင္းမွ၀ယ္လာသည္)
    - ၾကက္သြန္နီ၊ၿဖဴ
    - ခရမ္းခ်ဥ္သီး
    - နံနံပင္
    - မက်ည္းသီးမွည္.


    ခ်က္နည္း
    - ငါးဖယ္ၿခစ္ကုိ ဆား၊အခ်ိဳမုန္.နဲ.နယ္ၿပီး ေၾကာ္ပါ။
    - ဆီပူလွ်င္ ၾကက္သြန္နီ၊ၿဖဴ ကုိေၾကာ္ပါ။ ငရုတ္သီးမူန္.အနည္းငယ္ထည္.ပါ။
    - ၾကက္သြန္မ်ားႏြမ္းသြားလွ်င္ ခရမ္းခ်ဥ္သီးထည္.ေၾကာ္ပါ။
    - မက်ည္းမွည္. ရည္ ကုိ အနည္းငယ္ထည္.ပါ။
    - ခရမ္းခ်ဥ္သီး ေၾကသြားရင္ ခုနက ေၾကာ္ထားတဲ. ငါးဖယ္ေတြကုိေရာၿပီးေၾကာ္လုိက္ပါ။
    - ရခါနီးရင္ နံနံပင္ အုပ္ေပးလုိက္ပါေနာ္။


    မွတ္ခ်က္။ Scroll Bar/ Boxအား ခ်ဲ႔လိုပါက WIDTH: 300 ႏွင့္ HEIGHT:200တြင္ တန္ဖိုးထပ္တိုးႏိုင္ပါသည္။
    ဆက္ဖတ္ရန္
    Blog Widget by LinkWithin
     

    Popular Posts

    Widget by Blogger Buster

    Sign In and Check Message

    ယေန႔ဖတ္သြားေသာ ေခါင္းစဥ္မ်ား

    Recent Posts