Showing posts with label Windows. Show all posts

November 26, 2009

Turn On Remote Desktop in Windows 7 and Vista

Windows 7 ႏွင့္ Vistaသည္ ပံုမွန္အားျဖင့္ Remote Desktopအား ပိတ္ထားပါသည္။ သို႔ေသာ ၄င္းအား လြယ္ကူစြာျဖင့္ ဖြင့္ႏိုင္ပါသည္။ မိမိ၏ Vistaအား တျခားကြန္ပ်ဴတာမွ လွမ္းၾကည့္ခ်င္ပါက Remote Desktopအား ဖြင့္ဖို႔လိုအပ္ပါသည္။

မွတ္ခ်က္။ ။ Remote Desktopသည္ Business, Profesional, Ultimate Versionsတြင္သာ ပါပါသည္။ Home Editionတြင္ ယင္းမပါပါ။

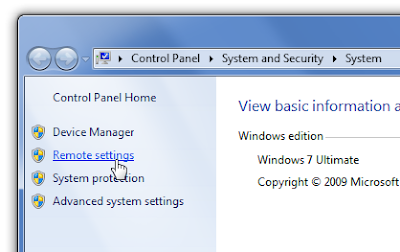
  1. System Configuration Page ကို သြားရပါမယ္။ ေခၚတဲ့နည္း (3)နည္းရွိပါတယ္။ (၁) - Start menu ေခၚ ၊ Menuမွ Computer ေပၚတြင္ Right-clickႏွိပ္ၿပီး ေပၚလာေသာ Menuမွ Properties ကိုႏွိပ္ပါ။ (2) Start Menuကိုေခၚပါ။ Search boxတြင္ Systemကို ရိုက္ထည့္၍ Enterေခါက္ပါ။ (၃) Control Panel > Systemကိုလည္း ႏွိပ္ႏိုင္ပါသည္။
  2. System Properties Windowsရဲ ဘယ္ဘက္အပိုင္းတြင္ Remote Settingကို ေတြ႔ရပါမည္။ ႏွိပ္လိုက္ပါ။

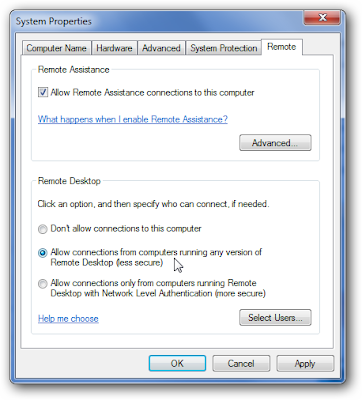
  3. System Properties Dialog Boxမွ Remote Tabေအာက္တြင္ "Allow Remote Assistance connection to this computer"ကိုအမွန္ျခစ္ျပပါ။ Remote Desktop ေအာက္တြင္ တတိယေရြးခ်ယ္မွဳကို ႏွိပ္လိုက္ပါ။

  4. Allpy > Ok
ဆက္ဖတ္ရန္

How to Create Password Reset Disk in Vista Using USB

လူတိုင္း လူတိုင္း မည့္သည့္အရာ၊ ကိစၥ မဆို တခါတရံ ေမ့တတ္ပါတယ္။ သို႔ျဖစ္ပါ၍ ကြန္ပ်ဴတာ အသံုးျပဳသူမ်ားသည္ ပို၍ ေမ့လြယ္ႏိုင္ပါသည္။ အဘယ္ေၾကာင့္ဆိုေသာ အခ်က္အလက္မ်ားစြာအား ဦးေႏွာက္ထဲသို႔ ထည့္သြင္းရပါေသာေၾကာင့္ျဖစ္သည္။

အခုတင္ျပမည့္ အေၾကာင္း အရာကေတာ့ USB Flash Driveကို အသံုးျပ၍ Windows Vista Admin Passwordအား (Reset) ျပန္လည္ ျပင္ဆင္ႏိုင္ရန္အတြက္ျဖစ္သည္။ ၾကိဳတင္ျပင္ဆင္မွဳ အေနနဲ႔ေပါ့။ တခါတရံ မိမိရဲ့ Passwordကို တျခားတေယာက္ေယာက္အား ေပးသိထားၿပီး Passwordအသစ္ကို ခဏခဏ ေျပာင္းလိုက္ရင္ ေမ့ႏိုင္ပါတယ္။ ဒါ့ေၾကာင့္ User Passwordကို ထည့္လိုက္တာနဲ႔ Password Resetလုပ္ဖို႔ သင့္ပါတယ္။
အကယ္၍ Windows Vista Userန႔ဲ Password တစ္ခုခုအားမွားယြင္းစြာ ရိုက္ထည့္လိုက္ပါက Error Message ထြက္လာမည္မွာ ေသခ်ာပါတယ္။
Reset Passwordလုပ္ဖို႔ USB တစ္ေခ်ာင္းေတာ့ လိုလိမ့္မယ္။ Floppy Diskကေတာ့ အခုေခတ္မွာ အသံုးနည္းသြားပါၿပီ။ ဒါ့ေၾကာင့္ USBနဲ႔ Reset Diskလုပ္ပါမယ္။ ေအာက္ပါအတိုင္းလုပ္ပါ။

  • ဦးစြာ USB Flash Driveအား ကြန္ပ်ဴတာႏွင့္ ခ်ိတ္ဆက္လိုက္ပါ။
  • Start Menu > Control Panel > User Account and Family Safety ႏွိပ္ပါ။
  • ထို႔ေနာက္ User Accounts ကိုႏွိပ္ပါ။
  • ထို႔ေနာက္ ဘယ္ဘက္ Paneတြင္ Create a password reset diskကို Task ရဲ့ေအာက္မွာႏွိပ္ပါ။

  • ထို႔ေနာက္ Password Reset Wizard's Welcome Screen Dialog Boxထြက္လာပါက Nextႏွိပ္ပါ။

  • ေနာက္တစ္မ်က္ႏွာတြင္ I want to create password key disk in the following driveတြင္ USB Driveကို ေတြ႔ပါမည္။ မဟုတ္ပါက ထပ္ေရြးၿပီး Nextကိုႏွိပ္ပါ။
  • လက္ရွိ User Password Boxထဲတြင္ လက္ရွိ Userရဲ့ Passwordကို ရိုက္ထည့္လုိက္ပါ။ ထို႔ေနာက္ Nextကိုႏွိပ္ပါ။ အကယ္၍ မိမိUserတြင္ Passwordမရွိေသးပါက Password boxကို အလြတ္ထားလိုက္ပါ။ အရင္ဦးဆံုးထည့္ထားပါက ေကာင္းပါလိမ့္မည္။


  • Prograss Barက ၁၀၀%ျပည့္သြားပါက Finishကိုႏွိပ္ပါ။ USBကို မလိုအပ္ေသးပါက ျဖဳတ္ႏိုင္ၿပီး လိုအပ္လ်င္ ထို USBအား နံမည္တပ္မည္/ သို႔မဟုတ္ အနာဂတ္မွာ Password Rest အသံုးျပဳဖို႔ အမွတ္အသားျပဳႏိုင္ပါသည္။
  • Password Reset Disk လုပ္ၿပီးသြားပါၿပီ။

Windows Vistaတြင္ Password ေမ့သြားၿပီး Reset လုပ္လိုပါက.

  • USBကို ကြန္ပ်ဴတာႏွင့္ ခ်ိတ္ဆက္လိုက္ပါ။ ထို႔ေနာက္ ကြန္ပ်ဴတာကိုဖြင့္လိုက္ပါ။
  • Longo ေနရာေရာက္ေနပါက Reset Passwordကိုႏွိပ္ပါ။

  • Password Reset Wizardတြင္ Next ကိုႏွိပ္ပါ။


  • ထို႔ေနာက္ The password key disk is in the following drive list စာသားေအာက္တြင္ မိမိ Reset Diskကို ေရြးၿပီး Nextကိုႏွိပ္ပါ။
  • ေနာက္ Screenတစ္ခုတြင္ Password အသစ္ကို ရိုက္ထည့္ပါ။ Confirmျဖစ္ဖို႔ ေနာက္တစ္ေခါက္ ရိုက္ထည့္ပါ။ Nextကို ထပ္ႏွိပ္ပါ။
  • ေနာက္ Screenတစ္ခုတြင္ ခုဏကရိုက္ထည့္တဲ့ Passwordကို ထပ္ရိုက္ပါ။ Confirm fieldတြင္ ထပ္ရိုက္ပါ။ Password hintကိုထည့္ Passwordမွတ္မိလြယ္ေအာင္ ရိုက္ထည့္ႏိုင္ပါသည္။

  • ထပ္ၿပီး Nextကို ထပ္ႏွိပ္ပါ။ Wizardကို Finishႏွိပ္၍ ပိတ္လိုက္ပါ။
  • ေနာက္ဆံုး Vista Userအား Passwordအသစ္ျဖင့္ ရိုက္သြင္း ၀င္လိုက္ပါ။

မွတ္ခ်က္။ ။ USBနဲ႔ Password Resetလုပ္တာနဲ႔ ပတ္သတ္လို႔ မည္သည့္ Vista Edition မဆို ျပဳလုပ္ႏိုင္ပါတယ္။ သို႔ေပမယ့္ မိမိ Vistaကို Password Reset Disk လုပ္ထားတဲ့ USBကို တျခားကြန္ပ်ဴတာအား အသံုးျပဳ၍ မရပါ။ ယင္း USB Reset diskအား လံုးျခံဳသည့္ေနရာတြင္ ထားရပါမည္။


ဆက္ဖတ္ရန္

August 14, 2009

Run Boxထဲမွာ gpedit.msc ဖြင့္လို႔ မရပါက

ယု္မု္ေသွ္ယာ့့၀းသာ လု္ယု္ကြန္ပ်ဴတာ run box ဖုိင္ဏွ္ gpedit.msc ေဍာဟ္လင္ေဏ၀္လုိင္ေအး.. မု္၀းမာ ပု္ေသွ္လယ့္ဏွ္ စာ္ဂုဏ္စာ္တာ၀း ေဆ၀္လွ္.
ကၽြန္ေတာ္ဘာ လုပ္ရမွာလဲ။ Run Boxထဲမွာ gpedit.mscရိုက္ထည့္လုိ႔ မရလို႔ ဘယ္လိုလုပ္ရမယ္ဆိုတာ ေက်းဇူးျပဳ၍ ေျပာျပပါဦး။

ေမးလာပါတယ္။


ဒါကို မေျဖၾကားခင္ ကၽြန္ေတာ္ ေမးခြန္တစ္ခု ထုတ္ခ်င္ပါတယ္။

သင္၏ Windows XPက Home Editionျဖစ္ေနပါသလား။ Home Editionဆိုရင္ gpedit.msc (Group Policy Editor) မပါလာပါဘူး။ အဘယ္ေၾကာင့္ဆိုေသာ XP Homeသည္ Standalone versionျဖစ္ေသာေၾကာင့့္ျဖစ္သည္။

Windows Vista ျဖစ္ေနပါက Vista Home Premiumဆိုရင္ gpedit.mscမပါလာပါ။ Vista Business, Ultimate and Enterpriseဆိုရင္ ပါလာပါတယ္။ တိက်တဲ့ Informationကို သိခ်င္ရင္ေတာ့ ဒီ Forumမွာ ၀င္ၾကည့္ႏိုင္ပါတယ္။
အကယ္၍ တျခား Version အထူးသျဖင့္ Windows XP Proဆိုရင္ေတာ့ ပါလာပါတယ္။ ပါလာရဲ့သားနဲ႔ ေခၚလို႔ မရေသးဘူးဆိုရင္ Virus ေၾကာင့္ အမ်ားဆံုးျဖစ္ႏိုင္ပါတယ္...

Registry Editorထဲမွာ သြားၿပီး ျပင္ဆင္ႏိုင္ပါတယ္။ သို႔ေပမယ့္ Registry Editorထဲတြင္ အျပင္အဆင္ မွားသြားပါက မိမိ၏ Windows problemsမ်ားစြာ ျဖစ္လာႏိုင္ေသာေၾကာင့္ မတင္ျပခ်င္ပါ။ ထို႔ေၾကာင့္ Consoleထဲတြင္ သြင္းထည့္ႏိုင္ပါသည္။
  • Start menu > Run > "mmc"ကို ရိုက္ထည့္ပါ။ Consoleဖြင့္ျခင္းျဖစ္သည္။
  • Console 1 Windowမွ File menu> Add/Remove snap in...ကိုႏွိပ္ပါ။
  • Add/Remove snap in.. dialog boxမွ Add buttonကိုႏွိပ္ပါ။ ပံုပါအတိုင္းျဖစ္သည္။
  • ထို႔ေနာက္ Add Standalone snap-in dialog boxမွ Available Standalone snap-ins ေအာက္ကိုသြားၿပီး Group Policy Object Editorကို selectလုပ္ကာ Add buttonႏွိပ္လိုက္ပါ။
  • ထို႔ေနာက္ Finish buttonကို ႏွိပ္လိုက္ပါ။ Okဆက္ႏွိပ္ပါ။ Saveလုပ္ပါ။
  • ဒါဆိုရင္ gpedit.msc ေပၚလာပါၿပီ။
အကယ္၍ မရေသးပါက အေၾကာင္းၾကားပါရန္။
ဆက္ဖတ္ရန္

February 23, 2009

Hide Local Disk

မိမိ၏ ကြန္ပ်ဴတာထဲတြင္ရွိေသာ Local Diskမ်ားအား ဖ်က္လိုပါက ...

၁) Desktopေပၚတြင္ရွိေသာ My Computer Iconေပၚတြင္ R-clickႏွိပ္၍ Manageကိုႏွိပ္ပါ။

၂) Computer Management ေအာက္တြင္ Disk Managementကို ႏွိပ္ပါ။

၃) အလယ္ panelတြင္ Locla Disk (C)ႏွင့္ (D)ကို ေတြ႔ပါလိမ့္မည္။ Local Disk (D)ေပၚတြင္ R-clickႏွိပ္၍ ေပၚလာေသာ Menuမွ Change Drive letters and pathsကို ႏွိပ္ပါ။


၄) Dialog boxထြက္လာေသာအခါ Remove ကိုႏွိပ္၍ OKကိုႏွိပ္ပါ။ ဖြက္ထားလိုက္ပါၿပီ။ ပံုအတိုင္း ေပ်ာက္သြားပါၿပီ။


၅) ျပန္ေဖၚလိုပါက - Computer Management > Disk Managment > R-click " " > Change Drive Letters and pahtsႏွိပ္ပါ။

၆) ေနာက္ Dialog boxတြင္ Addကို ႏွိပ္ပါ။


၇) ေနာက္ dialog box တစ္ခုတြင္ Addလုပ္ရန္ Dကို ေရြးထားသျဖင့္ Ok ႏွိပ္ရံုပါ။ ဒါဆိုရင္ D ျပန္ေပၚလာပါၿပီ။

Comment ေလးမ်ား ေပးသြားပါဦးလား။
ဆက္ဖတ္ရန္

February 22, 2009

Creating User Accounts - Part 3

ဤသင္ခန္းစာႏွင့္ ပတ္သတ္၍ တင္ျပဖို႔ အခ်ိန္ၾကာသြားပါသည္။ အဘယ္ေၾကာင့္ဆိုေသာ္ ၂၀၀၉ Januaryလက ထုတ္လြင့္ေသာ Windows 7ကို စိတ္၀င္စားသြားၿပီး ကၽြန္ေတာ့္ရဲ့ ကြန္ပ်ဴတာမွာလည္း Windows 7 တင္ျဖစ္လိုက္တယ္။ ကၽြန္ေတာ့အျမင္မွာေတာ့ Window Vistaထက္ ေကာင္းတယ္လို႔ ထင္ပါတယ္။ ပို၍ ျမန္ဆန္လာပါတယ္။ Vistaကို သံုးရတာ သိပ္အဆင္မေျပဘူး။ မဆင္မေျပတာက XPေလာက္ မေကာင္းလို႔ပါ။ ေတာ္ေသးပါရဲ့ မ၀ယ္ျဖစ္တာ။ ကဲ ေကာင္းၿပီ။ Windows 7 နဲ႔ပဲ တင္ျပသြားပါမယ္။

User Account ဖန္တီးရန္ ....

၁) Desktopေပၚမွာရွိတဲ့ My Computer Iconေပၚတြင္ R-clickႏွိပ္၍ ေပၚလာသည့္ Menuမွ Manageကို ႏွိပ္ပါ။

၂) Computer Management Windowမွ Left panelတြင္ Local Users and Groupsေအာက္မွ User ကိုႏွိပ္ပါ။

၃) ထို႔ေနာက္ Users panelတြင္ လြတ္ေနေသာ ေနရာ၌ R-clickႏွိပ္၍ ေပၚလာေသာ Menuမွ New Userကို
ႏွိပ္ပါ။


၄) New User dialog boxတြင္ User name, Full name, Description, Password, Confirm passwordတို႔
ကို မိမိလိုသလို ရိုက္ထည့္လိုက္ပါ။ ပံုတြင္ ျပထားသည့္အတိုင္း ကိုးကားပါ။ ထို႔ေနာက္ Confirm password
ေအာက္တြင္ User cannot change password (သို႔) Password never expiresကို ေရြးပါ။ ထို႔ေနာက္
Create ကို ႏွိပ္ပါ။ ၿပီးက Close buttonကို ႏွိပ္ပါ။ ဖန္တီးၿပီးသြားပါၿပီ။ သို႔ေသာ္ ထိုuserသည္ ရိုးရိုး User
သာျဖစ္သည္။


- မိမိျပဳလုပ္လိုက္ေသာ Userေပၚတြင္ R-clickႏွိပ္၍ Propertiesကို ႏွိပ္လိုက္ပါ။


၆) Moe properties dialog box တြင္ Tab သံုးခုမွ Member of tabကို ႏွိပ္လိုက္၍ Add buttonကို
ဆက္ႏွိပ္ပါ။


၇) ထို႔ေနာက္ Select Groups dialog boxမွ Advancedကို ဆက္ႏွိပ္ပါ။ ထို႔ေနာက္ Select Groups dialog
box ေနာက္တစ္ခုေပၚလာပါမည္။

- ထို dialog boxမွ Find now ကိုႏွိပ္၍ မိမိ ေပးလိုေသာ User typeကို ေရြးခ်ယ္လိုက္ပါ။ ဥပမာ -
Administrator ဆိုပါစို႔။ ေရြးခ်ယ္ၿပီးက Ok ကိုႏွိပ္ပါ။ ေနာက္ Okကို ဆက္ႏွိပ္ပါ။


၈) ဒါဆိုရင္ User type ယူၿပီးသြားပါၿပီ။ မိမိ၏ User groupသည္ ႏွစ္ခုျဖစ္ေနပါသည္။ ၄င္းတို႔မွာ
Administratorႏွင့္ Usersတို႔ျဖစ္သည္။ Userကို ဖ်က္ပစ္ႏိုင္ပါသည္။

၉) ဖ်က္ပစ္ရန္ - Moe properties dialog boxမွ Userကို Selectလုပ္၍ Removeႏွိပ္ပါ။ ထို႔ေနာက္ Apply
ႏွိပ္၍ Ok ဆက္ႏွိပ္ပါ။ ၿပီးပါၿပီ။

မွတ္ခ်က္။ ။ သင္သည္ User ကန္႔သတ္ခ်က္ႏွင့္ ပတ္သတ္၍ Userတစ္ခု၏ လုပ္ေဆာင္ႏိုင္မွဳ အခ်က္ အလက္မ်ားကို ကန္႔သတ္ႏိုင္ပါသည္။ ဥပမာ- Administrator, Power User, Local User, User စသည္ျဖင့္ သတ္မွတ္ႏိုင္ပါသည္။


Comment ေလးမ်ား ဖတ္ခ်င္ပါတယ္။
ဆက္ဖတ္ရန္
Blog Widget by LinkWithin
 

Popular Posts

Widget by Blogger Buster

Sign In and Check Message

ယေန႔ဖတ္သြားေသာ ေခါင္းစဥ္မ်ား

Recent Posts